

Did you know that over 70% of modern vehicles come with infotainment systems that become outdated within just three years? This rapid obsolescence leaves drivers with limited options and expensive upgrade paths.
Our comprehensive guide offers a powerful alternative. We’ll walk you through creating a custom solution that transforms your vehicle’s sound experience. This approach combines affordable hardware with powerful open-source software.
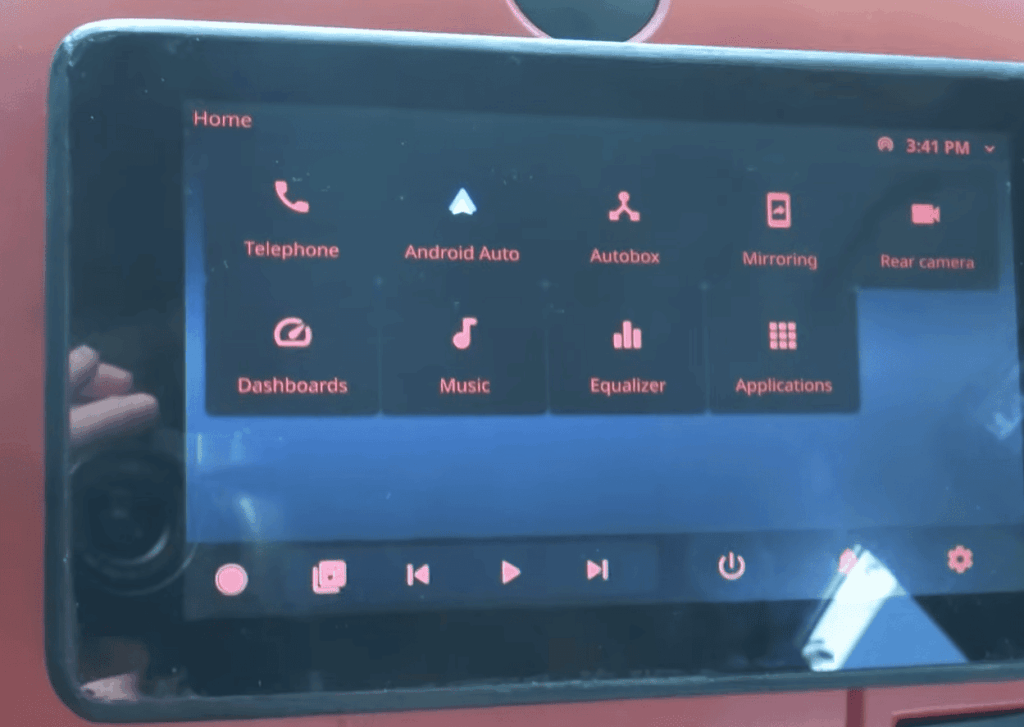
You’ll discover why this platform is ideal for automotive applications. It offers incredible flexibility, expandability, and complete control over every aspect of your system. The possibilities go far beyond basic music playback.
This innovative setup allows integration of advanced features like GPS navigation, software-defined radio, and touchscreen controls. All these elements work together in one cohesive unit that you design and build yourself.
Whether you’re a DIY enthusiast seeking an upgrade or a tech hobbyist wanting a challenging endeavor, this guide provides everything needed for success. We cover hardware selection, power management, and software configuration in detail.
Key Takeaways
- Create a custom infotainment system that avoids manufacturer obsolescence
- Combine affordable components with powerful open-source software
- Gain complete control over your vehicle’s audio and technology features
- Integrate advanced functionalities like navigation and touchscreen controls
- Follow a detailed roadmap for professional-quality results
- Learn about proper power management and cooling solutions
- Customize every aspect to match your specific needs and preferences
Introduction
Commercial head units frequently disappoint with their lack of physical controls and poor smartphone integration. Many drivers find modern touchscreen-only interfaces frustrating and less safe to use while driving.
Building your own solution offers a compelling alternative. You gain complete control over features and design. This approach lets you keep classic knobs for volume and tuning while adding modern navigation.
The initial time investment pays off with a perfectly personalized setup. Unlike pre-built options, you can upgrade individual parts later without replacing the entire unit.
| Feature | Commercial Unit | Custom Build |
|---|---|---|
| Control Interface | Mostly touchscreen | Physical knobs & touch |
| Upgrade Path | Replace entire system | Upgrade components |
| Personalization | Limited options | Total customization |
| Long-Term Value | Becomes obsolete | Evolves with your needs |
This flexibility is why custom audio projects are so popular. Combining affordable computing boards with selected peripherals creates a powerful and unique entertainment experience for your vehicle.
Planning Your Raspberry Pi Car Stereo Build
Before purchasing a single component, thoughtful planning ensures your build meets all your needs. This preparation phase saves time and money while delivering better results.
A clear roadmap helps you avoid common pitfalls. It also ensures your final installation looks professional and functions reliably.
Defining Your Audio and Display Goals
Start by listing your must-have features for the entertainment system. Consider whether you need GPS navigation, smartphone connectivity, or traditional radio reception.
Your display choices significantly impact usability. Think about screen size, resolution, and whether touch capability matters for your driving habits.
Many builders create cardboard mockups of different screen sizes. This simple technique helps visualize what fits best in your dashboard without blocking vents or controls.
Assessing Your Vehicle Layout and Installation Space
Carefully measure your available dashboard space before selecting components. Look for mounting locations that maintain visibility and safety.
Vehicle interiors face extreme temperature challenges. Dashboard surfaces can reach 180°F during summer months, exceeding most electronics’ operating limits.
Document your existing speaker configuration and wiring layout. This knowledge simplifies integration with your new custom setup.
Plan for future expansion from the beginning. Consider features like backup cameras or steering wheel control integration that you might want later.
Selecting the Right Hardware Components
Quality components form the backbone of a reliable automotive entertainment setup that withstands daily use. Choosing the right parts ensures your system performs well under varying conditions. This selection process balances performance, compatibility, and durability.

Choosing the Ideal Raspberry Pi Model
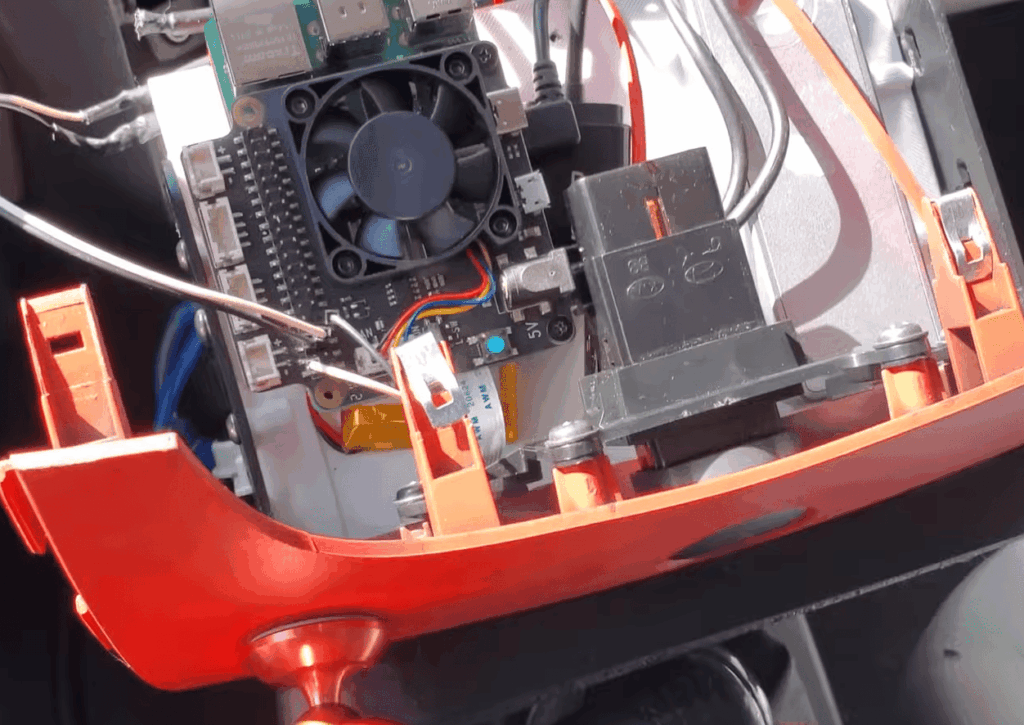
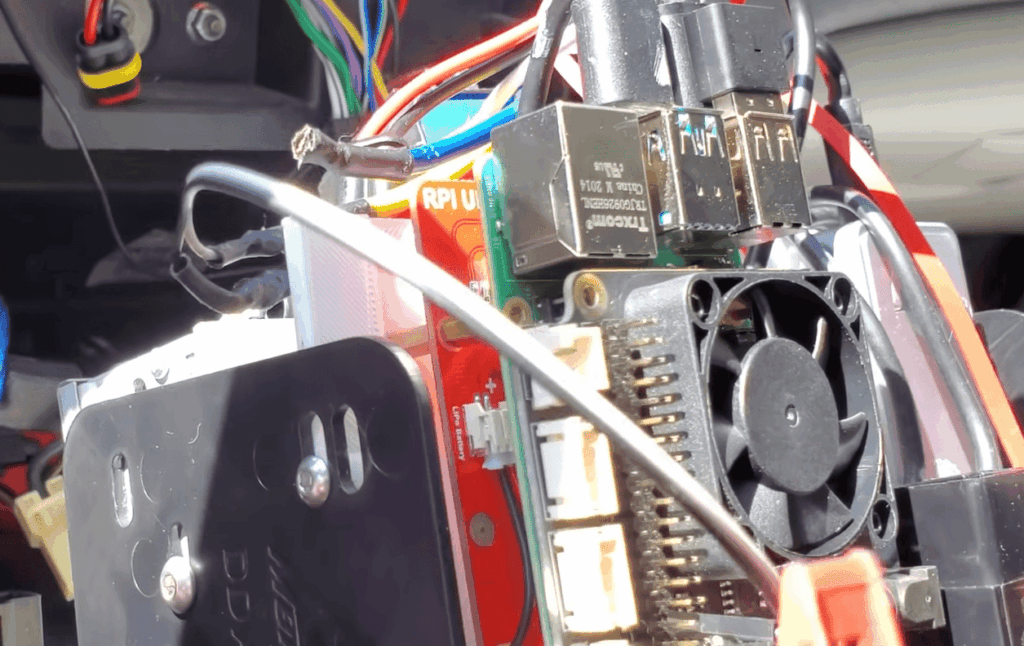
The Raspberry Pi 4 Model B stands out as the preferred choice for most builds. Its ARM Cortex-A72 processor delivers ample power for audio processing and display management. This computing board handles multiple peripherals simultaneously without strain.
When availability or budget constraints arise, alternative models like the Pi 3 or lower-memory Pi 4 variants work effectively. These devices still provide satisfactory performance for basic functions. The 40-pin GPIO header supports various expansion cards and accessories.
Identifying Essential Audio and Display Parts
Display selection significantly impacts usability in bright vehicle interiors. IPS panels with capacitive touch screens offer superior viewing angles and responsiveness. The Waveshare 7-inch 1024×600 model represents an excellent balance of size and compatibility.
Audio components require careful consideration for clean sound output. A quality USB sound card capable of driving multiple speakers proves essential. Supporting devices like real-time clock modules maintain accurate time between power cycles.
Planning around proven hardware combinations reduces troubleshooting time. This approach ensures all components work harmoniously together.
Power Management and Safe Shutdown Solutions
The harsh reality of vehicle electronics is that improper power handling can transform your innovative build into a frustrating battery-draining liability. Unlike standard computers, automotive systems lack true sleep modes, making complete shutdown the only safe option when parked.
Your custom entertainment setup must disconnect entirely from the vehicle’s electrical system to prevent parasitic drain. This requires a sophisticated approach to power control that balances convenience with battery protection.
Implementing GPIO-Poweroff Strategies
The gpio-poweroff overlay provides an elegant solution for safe shutdown sequencing. This tool configures a specific GPIO pin to signal when the operating system has completed its shutdown process.
When this pin activates, it indicates that cutting power is now safe. A custom circuit board should monitor this signal and physically disconnect the supply to both the main computer and all connected accessories.
This approach ensures no components remain powered after shutdown. Proper implementation includes a brief delay to confirm all peripherals have powered down completely.
Integrating CAN Bus Signals for Power Restoration
Automated wake-up functionality adds significant convenience to your installation. Monitoring the vehicle’s CAN bus allows your system to detect when the car becomes active again.
Events like door unlocks or ignition signals can trigger automatic power restoration. This eliminates the need for manual switches while maintaining battery protection.
Advanced implementations can also monitor battery voltage levels. This prevents system activation when the vehicle’s power supply is already low, offering additional protection against dead batteries.
Optimizing Cooling and Fan Solutions in Car Environments
The success of your custom entertainment system hinges on proper thermal management in harsh vehicle conditions. Dashboard areas can reach 165-180°F in direct sunlight, making active cooling essential for reliability.
Evaluating Fan HAT Options and Heat Dissipation
Many builders overlook thermal management, but vehicle interiors demand robust solutions. The Argon Fan HAT offers excellent cooling with its 40mm fan and I2C-based speed control.
This accessory communicates at address 0x1A and provides software-controlled operation. The Argon One Daemon by DarkElvenAngel delivers superior fan control written in C.
It ensures quiet operation when cool while providing maximum cooling during high-demand periods. This approach maintains optimal temperature ranges even in extreme conditions.
Stacking Header Considerations for Thermal Efficiency
The computing board ships with standard GPIO pins that block airflow when HATs stack above. This makes fan placement ineffective for CPU cooling.
The solution involves carefully desoldering the factory header and installing a stacking header. Ground pins require extra heat due to their connection to dedicated copper layers.
With stacking headers installed below, interface boards can mount underneath. This allows the fan HAT to sit on top for optimal airflow to critical components.
Proper stacking creates a clean, compact assembly that maintains all expansion capabilities. It ensures your system stays cool despite challenging automotive environments.
Integrating a VFD Display and Custom Faceplate for Retro Design
The warm glow of vacuum fluorescent displays offers a nostalgic aesthetic that complements classic vehicle interiors perfectly. This technology creates a distinctive look that stands apart from modern LCD and OLED options.
VFDs provide excellent visibility in various lighting conditions. Their bright character enhances readability during daytime driving while maintaining that sought-after retro appeal.
Selecting the Right VFD Module
The Noritake GU128x64D-K610A8 module delivers outstanding performance for automotive applications. This 5V device supports multiple communication modes including SPI and async serial interfaces.
While I2C implementation can be challenging, async serial via FTDI adapter proves reliable. The module includes built-in fonts and pixel-addressable graphics capability.
This versatile display maintains excellent contrast compared to LCD technology. It’s ideal for showing station information and track details clearly.
Designing a Custom Faceplate and Mounting Solution
Creating an authentic installation begins with proper enclosure selection. Gutted factory radio housings from eBay provide perfect double-DIN dimensions without custom fabrication.
Smoked plexiglass faceplates allow the bright VFD to shine through when active. When powered off, the display remains nearly invisible for a clean, integrated appearance.
Professional 3D printing services can create faceplates with precise cutouts. This approach accommodates your specific control knobs and additional buttons seamlessly.
| Feature | VFD Display | OLED Display |
|---|---|---|
| Brightness | Superior in sunlight | Can wash out |
| Viewing Angle | Excellent wide angles | Limited optimal range |
| Retro Aesthetic | Authentic vintage look | Modern appearance |
| Power Consumption | Moderate requirements | Generally lower |
The combination of VFD technology with thoughtful faceplate design creates a unique retro-modern aesthetic. This approach respects classic radio design while incorporating cutting-edge functionality.
Setting Up the Control Interface with Knobs and LED Rings
Physical controls provide the safest interaction method for drivers who need to keep their eyes on the road. Unlike touchscreen interfaces that demand visual attention, well-designed knobs allow for muscle memory operation without distraction.
The classic two-knob layout has proven its effectiveness over decades. This intuitive setup positions volume control on the left with a push-button function, while the right knob handles tuning duties.
Utilizing Rotary Encoders for Volume and Tuning
Modern rotary encoders bring digital precision to traditional knob controls. The DuPPA I2CEncoder, developed by automotive engineers in Turin, Italy, offers exceptional build quality with illuminated aluminum knobs.
These specialized input devices communicate through the I2C bus, simplifying your wiring setup. Multiple encoders can share the same communication lines, reducing cable clutter in your installation.
Tactile feedback ensures positive engagement with each adjustment. The satisfying click mechanism provides confirmation without requiring visual verification.
Incorporating Illuminated LED Rings for Dynamic Feedback
Surrounding each encoder with RGB LED rings creates instant visual feedback for system status. These illuminated circles can display volume levels, signal strength, or mode indicators through color changes.
Programmable patterns allow customization to match your vehicle’s interior lighting. The rings provide clear information at a glance, eliminating the need to read small text displays while driving.
Nighttime visibility becomes excellent with adjustable backlighting. You can match the brightness to your dashboard illumination for seamless integration.
| Control Feature | Physical Knobs | Touchscreen Only |
|---|---|---|
| Eyes-Free Operation | Excellent muscle memory | Requires visual attention |
| Safety While Driving | Minimal distraction | Significant visual demand |
| Tactile Feedback | Positive physical engagement | No haptic response |
| Learning Curve | Instantly intuitive | Requires familiarization |
This control interface combines the best of traditional and modern technology. You get the safety of physical controls with the dynamic feedback of digital indicators.
Configuring the CAN Bus and Vehicle Integration
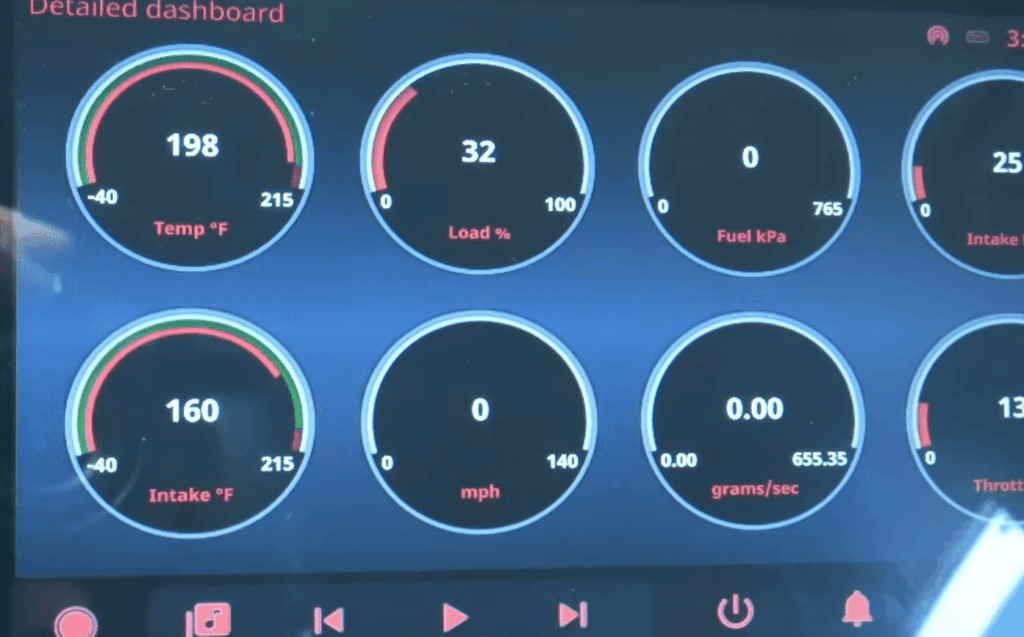
The true power of an integrated entertainment system emerges when it can communicate directly with your vehicle’s internal systems. This connection transforms basic audio playback into an intelligent interface that understands your automobile’s status.
Vehicle integration enables reading diagnostic codes and monitoring engine parameters. It also allows automatic wake-up when doors unlock or ignition starts.
Setting Up a Dedicated CAN Interface Card
The Waveshare 2-CH CAN HAT provides excellent dual-channel capability for automotive applications. This interface card uses the reliable MCP2515 controller communicating over the SPI bus.
Critical protection features include galvanic isolation and TVS diodes. These safeguard your electronics from voltage spikes common in automotive environments.
Built-in driver support simplifies installation. The compact design fits neatly with other components in your setup.
Leveraging SocketCAN for Vehicle Communication
SocketCAN integration allows standard Unix socket programming for CAN communication. This approach makes development straightforward for network programmers.
The can-utils package provides essential command-line tools for development. You can sniff traffic, send test messages, and debug your connection.
Access typically occurs through the OBD-II port or existing wiring. Proper termination resistance ensures reliable bus communication.
| Feature | Single-Channel Interface | Dual-Channel Card |
|---|---|---|
| Network Support | One CAN bus | Multiple networks |
| Vehicle Compatibility | Basic systems | Advanced integrations |
| Connection Flexibility | Limited options | Simultaneous monitoring |
| Protection Level | Standard safety | Enhanced isolation |
Establishing GPS and Software Radio Features
Your custom entertainment system gains powerful capabilities when you integrate location awareness and flexible radio reception. These features transform basic audio playback into a sophisticated travel companion.
Configuring the GPS Module for Accurate Positioning
The SparkFun GPS Breakout uses the u-blox NEO-M9N-00B module for reliable positioning. After testing different interfaces, the UART connection at 38400 baud proved most dependable.
This device continuously transmits NMEA data packets including position and satellite information. Your software can parse this data for multiple applications beyond navigation.
Proper antenna placement ensures optimal reception in your vehicle. Mounting near the windshield or on the roof provides the best signal source for consistent accuracy.
Implementing Software Defined Radio for FM/VHF Reception
The Nooelec NESDR SMArTee XTR offers impressive SDR capability for under $50. This USB device connects easily and supports broadcast AM, FM, and VHF signals.
Using the librtlsdr library, the radio samples signals and provides raw data requiring demodulation. The computing board handles this processing with surprisingly low overhead.
You can build frequency databases to show station names on your display. This creates a user experience similar to commercial receivers.
The combination of GPS and SDR enables advanced features like location-based station scanning. You can also record signals with precise time stamps and coordinates.
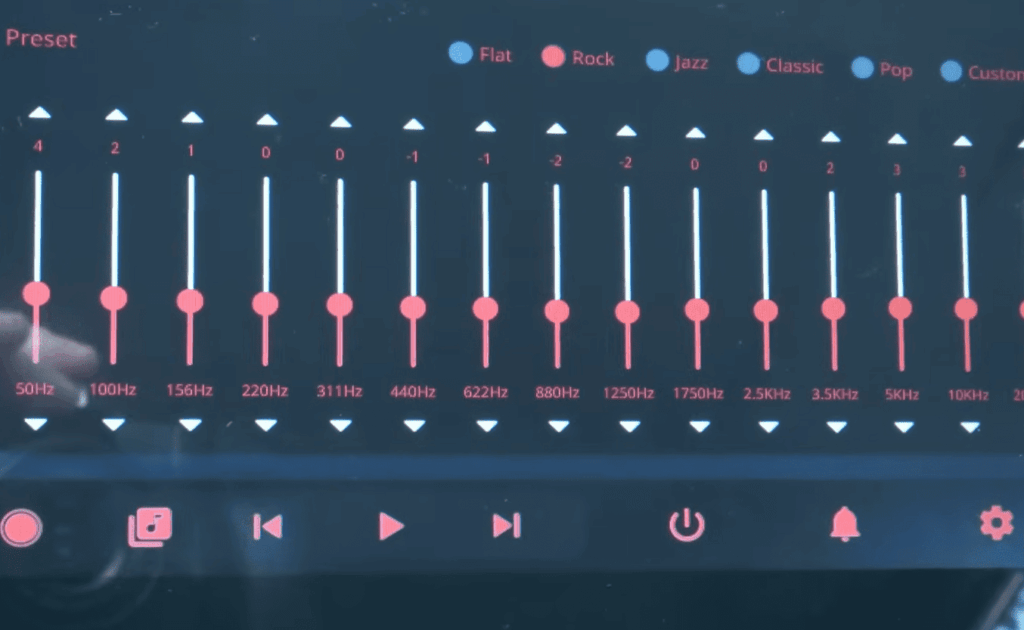
Understanding Audio Playback and External Sound Cards
Audio quality separates amateur builds from professional-grade installations. The listening experience in your vehicle depends heavily on proper component selection and configuration.
Dedicated USB sound cards dramatically improve output compared to basic audio jacks. They provide cleaner sound with better signal-to-noise ratio and proper multi-channel support.
Integrating a 6-Channel Sound Card for Multiple Speakers
The VAlinks 6-Channel 5.1 USB adapter offers excellent value at around $20-30. This device provides separate front and rear stereo outputs plus center/subwoofer channels.
Multiple output channels allow independent speaker control throughout the cabin. The sound card includes a LINE IN port for auxiliary device connectivity.
Smartphones and MP3 players integrate seamlessly through this input. Custom software can capture LINE IN audio and process it through your volume control system.
Optimizing ALSA Configuration for Clean Audio Output
ALSA (Advanced Linux Sound Architecture) provides the foundation for all audio operations. It offers a consistent programming interface regardless of which USB sound card you connect.
Proper configuration involves setting the correct default sound card and adjusting mixer levels. You may need custom PCM device definitions for specific audio routing needs.
Managing multiple simultaneous sources requires careful software design. This includes fading GPS directions over music and handling system alerts smoothly.
| Feature | USB Sound Card | Built-in Audio Jack |
|---|---|---|
| Audio Quality | Professional-grade output | Basic sound quality |
| Channel Support | 6-channel capability | Stereo only |
| Input Options | LINE IN port included | Output only |
| Signal Clarity | Clean, noise-free sound | Potential interference |
The time invested in proper audio configuration pays off with professional-quality sound. Your system will rival factory audio at a fraction of the cost.
Advanced Projects and HAT Integration for raspberry pi car stereo
Advanced integration boards simplify complex vehicle installations by consolidating multiple functions. These specialized hats handle everything from power conversion to vehicle communication in one compact package.
Exploring CarPiHAT and PRO 5 Options
The TJD CarPiHAT represents a comprehensive solution for automotive projects. This single board integrates power management, safe shutdown, and multiple I/O interfaces.
The PRO 5 version adds a high-quality DAC and supports up to 5A power delivery. It maintains compatibility with various computing board models featuring 40-pin headers.
Five opto-isolated inputs monitor vehicle signals like reverse gear and illumination. Two high-current outputs control external devices such as amplifiers or lighting.
Enhancing Functionality with Additional I/O and Sensors
Community support plays a vital role in advanced projects. The BlueWave Studio forum contains valuable posts sharing real-world experiences.
An optional IO Expander board adds even more inputs and outputs. This expansion capability supports complex integrations requiring extensive sensor monitoring.
Professional Molex connectors ensure reliable connections in vibrating environments. These components make your project more robust and easier to maintain.
The integrated CAN bus port enables direct vehicle network communication. Built-in protection safeguards your electronics from automotive power spikes.
Conclusion
The journey of creating your own vehicle entertainment solution culminates in a system that perfectly matches your preferences and driving habits. This comprehensive build combines technical challenge with practical daily utility.
Your custom audio interface offers unprecedented flexibility compared to commercial alternatives. Physical knobs provide intuitive control while modern displays deliver rich information. The entire setup grows with your evolving needs.
Quality sound output and reliable power management ensure professional results. Integration with vehicle networks transforms basic playback into an intelligent dashboard companion.
This rewarding project develops valuable skills in hardware integration and software configuration. The satisfaction of using something you built yourself makes every drive more enjoyable.