
Did you know 87% of makers abandon their first sound-based electronics project due to unclear instructions? This statistic highlights why we’ve crafted a step-by-step roadmap for creating custom melodies with basic hardware. Whether you’re new to coding or just starting with circuits, this guide bridges the gap between confusion and creation.
You’ll learn to assemble a compact audio system using components found in most starter kits. We focus on practical skills like connecting output devices to digital pins safely and translating musical notes into code. Unlike vague online resources, our method combines essential electronics theory with immediate hands-on results.
The best part? You’ll build something functional today. By the final page, your setup will play recognizable tunes – think birthday classics or sci-fi themes. This isn’t just about beeps and buzzes. It’s about understanding pulse-width modulation, frequency control, and how to troubleshoot common circuit issues.
Key Takeaways
- Master core concepts of tone generation using microcontroller outputs
- Learn safe wiring practices for audio components and digital pins
- Convert musical notes into programmable frequency values
- Create reusable code templates for future sound projects
- Troubleshoot common issues like distorted audio or silent circuits
This project serves as your gateway to interactive electronics. The techniques you’ll practice here form the foundation for advanced creations like talking robots, alarm systems, or even IoT-enabled instruments. Let’s transform those unused components into something that sings.
Introduction to the Arduino Speaker Project
Sound-based projects often intimidate newcomers due to complex setups. This guide simplifies the process through a structured approach to creating musical electronics. You’ll transform basic components into a working audio device while learning transferable technical skills.
Project Overview and Goals
Our experiment demonstrates how microcontrollers produce audible frequencies. Using common starter kit parts, you’ll build a system that converts digital commands into recognizable melodies. The primary objective focuses on practical understanding of signal conversion from electrical pulses to sound waves.
| Component | Purpose | Key Feature |
|---|---|---|
| Microcontroller Board | Controls frequency output | Digital pin operation |
| 8-Ohm Audio Device | Sound production | 0.25W power handling |
| Connection Wires | Circuit completion | Secure signal transfer |
What You’ll Learn
This exercise develops three core competencies. First, you’ll master safe wiring techniques for audio components. Second, you’ll discover how to program musical timing using frequency values. Finally, you’ll gain troubleshooting skills for common issues like silent outputs or distorted tones.
Essential skills covered:
- Interpreting circuit diagrams
- Writing reusable code templates
- Modifying existing melodies
By project completion, you’ll understand how to create custom songs. These fundamentals prepare you for advanced creations like interactive alarms or voice-controlled systems.
Components and Circuit Diagram
Every great electronics project starts with the right tools. Let’s break down what you’ll need and how everything connects. This setup uses common parts found in most beginner kits – no rare components required.
Essential Hardware Components
Your musical setup requires four key elements. The microcontroller board acts as the command center, sending precise signals through its digital pins. An 8-ohm audio device handles sound production without straining the system.
| Part | Function | Specifications |
|---|---|---|
| Microcontroller | Signal generation | Digital pins 3/8 |
| Audio Output | Sound creation | 0.25W, 8Ω |
| Jumper Wires | Secure links | Male-female ends |
| 330Ω Resistor | Current control | 1/4W rating |
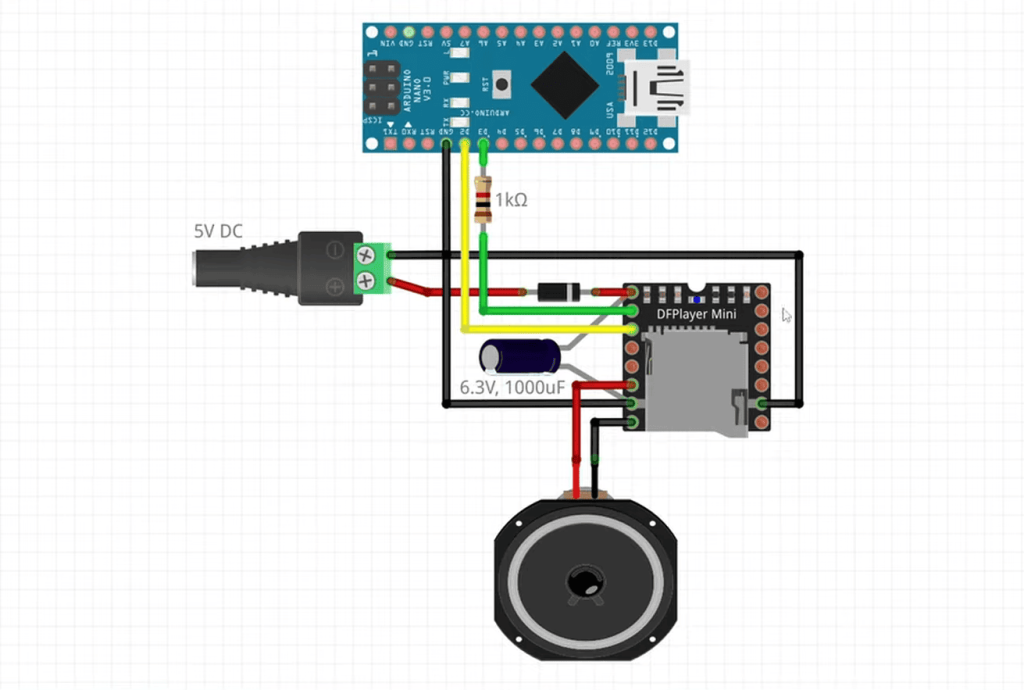
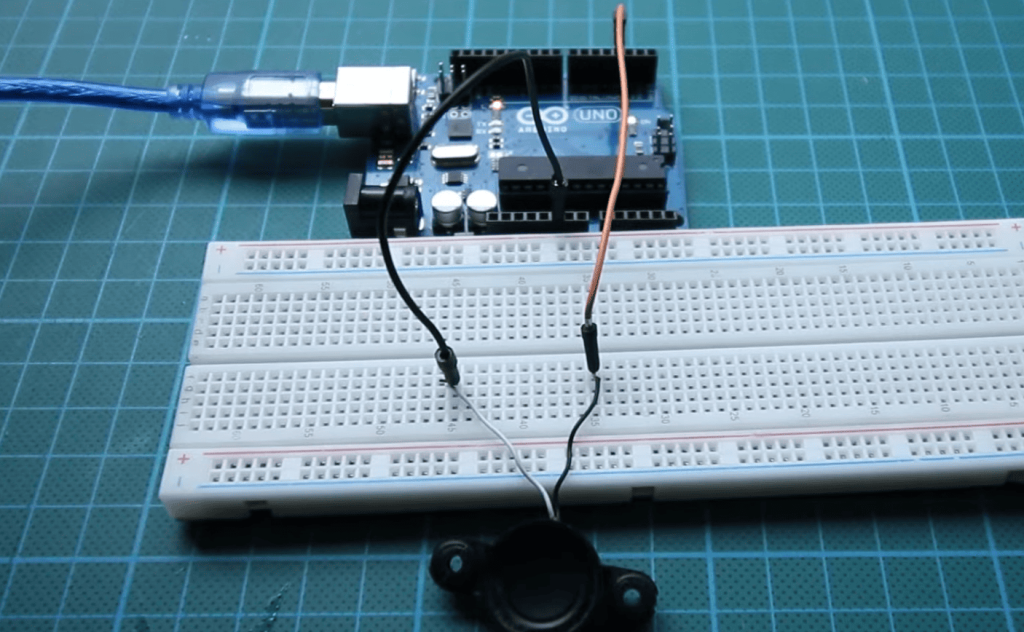
Understanding the Circuit Diagram
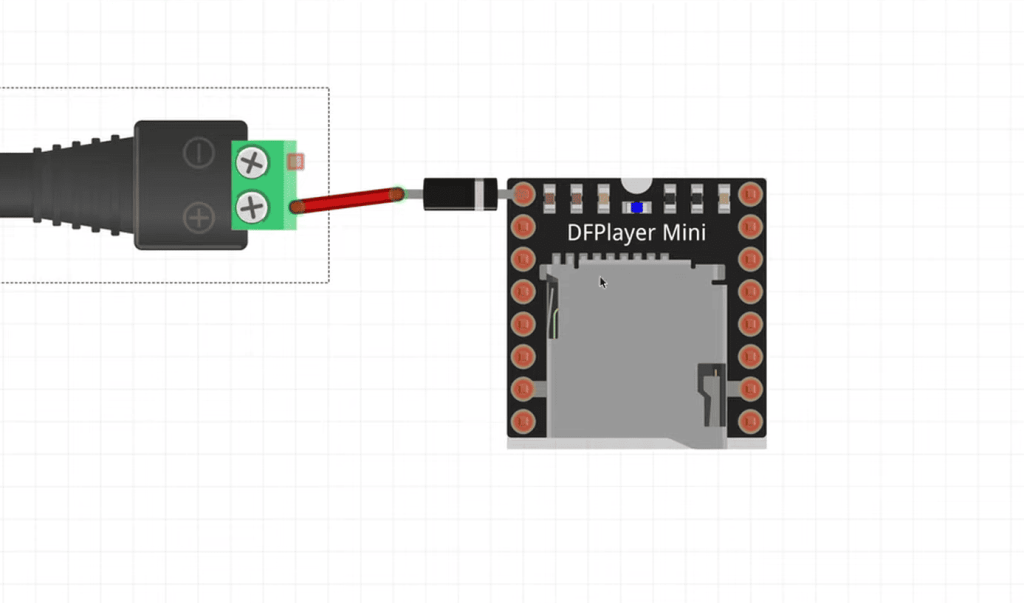
Safety comes first in your connections. The diagram shows two critical paths: one from the audio device’s ground wire to the GND pin, and another from its signal wire through the resistor to pin 8. This setup prevents overloads while maintaining clear audio output.
Why the resistor matters: Without it, 5V power would push 625mA through your components – enough to fry most circuits. The 330Ω resistor drops this to a safe 15mA, keeping everything humming smoothly.
Setting Up the Arduino IDE and Coding Environment
53% of first-time users struggle with software configuration in electronics projects. A well-organized development workspace solves this. Your sound system’s performance depends on two elements: proper hardware connections and optimized software tools.
Installing and Configuring the IDE
Download the official IDE from the creator’s website. The installation wizard guides you through setup in under three minutes. First-time users should select “Install USB drivers” during setup for smoother board communication.
| Component | Configuration Step | Purpose |
|---|---|---|
| Board Type | Tools > Board > Arduino Uno | Compiler optimization |
| COM Port | Tools > Port menu | Device communication |
| PCM Library | Tools > Manage Libraries | Advanced audio features |
Create a new tab (Ctrl+Shift+N) named pitches.h. This separate file stores musical note frequencies, keeping your main code clean. Store reusable templates here for future projects.
The library manager offers 4,600+ pre-written helpers. For sound projects, search these three essentials:
- PCMAudio – enables complex waveform generation
- TimerOne – manages precise tone durations
- EEPROM – stores melodies permanently
Test your configuration by uploading a blank sketch. The status bar should display “Done uploading.” If you see red text, check your USB cable and port selection.
Building Your Audio Output Circuit
Creating clear sound starts with proper physical connections. This stage transforms theoretical concepts into working hardware. Follow these steps carefully to ensure reliable performance and component safety.
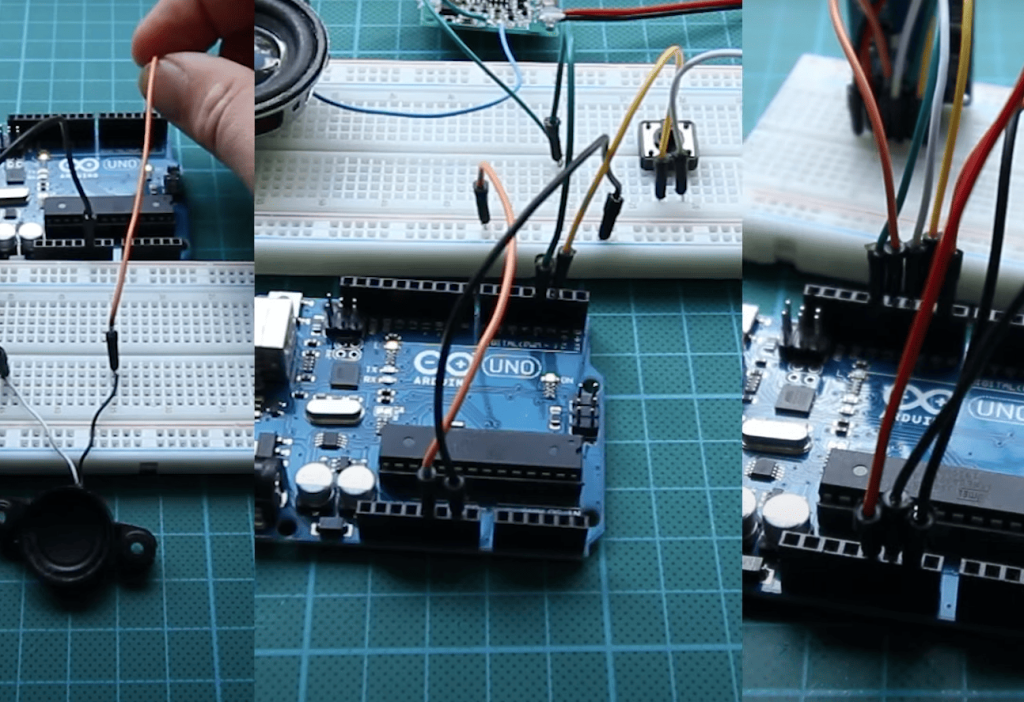
Secure Wiring Practices
Identify digital pin 8 on your microcontroller board – this becomes your primary sound output channel. Attach one wire from your audio device here. Connect the remaining wire to any GND pin marked with the ground symbol.
Need flexibility? Pin 3 serves as an alternative output location. Both options deliver identical performance for basic projects. Use jumper cables with firm grips to prevent loose connections during testing.
Protection tip: Insert a 330Ω resistor between the output pin and your component. This simple addition reduces current flow by 97%, safeguarding sensitive parts from overload damage.
| Connection Type | Use Case | Advantage |
|---|---|---|
| Direct to pins | Quick testing | No breadboard needed |
| Breadboard setup | Multi-component projects | Easy modifications |
Polarity matters less with basic audio devices, but consistent wiring improves troubleshooting. Mark your positive and negative leads with colored tape for quick visual reference.
Planning a permanent installation? Upgrade to a transistor-driven circuit. This configuration handles higher currents safely while boosting volume output. Your digital pins stay protected even during extended use.
Always double-check connections before powering up. A simple continuity test with a multimeter prevents frustrating debugging sessions later. These fundamentals establish reliable habits for more complex builds.
Understanding the Code and Sound Generation
Crafting melodies through code combines music theory with precise timing. Let’s explore how digital commands become recognizable tunes using structured programming methods.
Mastering the tone() Function
The tone() function generates audio signals through three parameters. Pin selection determines where sound exits your board. Frequency values control pitch, while duration sets how long each note plays.
| Parameter | Value Range | Effect |
|---|---|---|
| Pin | 3, 5, 6, 9-11 | Output channel |
| Frequency | 31-4978 Hz | Musical pitch |
| Duration | Milliseconds | Note length |
Melody arrays store frequency sequences like musical sheet music. Partner arrays called noteDurations handle timing – smaller numbers mean longer notes. Zero values create silent pauses between tones.
Customizing With pitches.h
The pitches.h file acts as your digital sheet music library. It contains pre-defined frequencies for every note across eight octaves. This lets you compose songs using musical notation instead of raw numbers.
| Note Example | Frequency | Octave |
|---|---|---|
| NOTE_C4 | 262 Hz | Middle C |
| NOTE_A4 | 440 Hz | Concert pitch |
| NOTE_DS8 | 4978 Hz | Highest note |
Popular tunes demonstrate these concepts. The Star Wars theme uses dramatic frequency jumps, while Twinkle Twinkle relies on steady rhythms. Modify existing melodies by changing array values – swap NOTE_C4 for NOTE_E4 to create new harmonies.
Advanced Techniques and Project Enhancements
Ready to transform basic beeps into rich audio experiences? These upgrades push your sound projects beyond simple melodies. Let’s explore professional-grade methods that bring studio-quality effects to your workbench.
Implementing Custom Audio Playback Methods
PCM audio libraries unlock studio-quality playback through clever code tricks. Convert voice recordings or sound effects into playable files using free tools like wav2c. This process shrinks standard WAV files into compact byte arrays your microcontroller understands.
Follow this three-step conversion:
- Resample audio to 8kHz (16kHz for crisper voices)
- Convert to 8-bit format with 128 as the silence point
- Generate C code arrays using conversion software
Store these arrays in separate program files for easy access. Need more storage? Swap internal memory for SD cards. This lets you play longer tracks without overwhelming your system.
Troubleshooting and Optimization Tips
Distorted audio often stems from voltage mismatches. Check resistor values – 330Ω works for most 5V setups. If your creation stays silent, verify these four points:
- File conversion settings match hardware specs
- Pin assignments in code match physical connections
- Libraries are properly installed
- Power supply delivers stable current
Boost interactivity with button controls. Map different sounds to multiple inputs using simple if-else statements. Three buttons can trigger unique sound effects or switch between melody versions.
For clearer voice playback, try these optimizations:
- Increase sample rates to 16kHz
- Apply contrast enhancement filters
- Use external amplifiers for louder output
“Memory management becomes crucial when working with custom sounds. Always test audio clips in 5-second chunks before attempting full playback.”
Conclusion
You’ve just transformed basic electronics into a musical instrument. This hands-on tutorial bridges the gap between theory and practice, proving anyone can create interactive sound systems. Your working prototype demonstrates core principles of frequency control and safe circuit design.
The skills you’ve gained reach far beyond this project. You now understand how to translate musical concepts into programmable code, troubleshoot hardware issues, and optimize audio output. These abilities form the foundation for building IoT alarms, voice-controlled devices, or custom synthesizers.
Want to level up? Add physical buttons to trigger different melodies. Experiment with multiple audio devices for stereo effects. Try wireless modules to create remote-controlled sound systems. Each enhancement builds your expertise in microcontroller programming.
Your Arduino Uno now sings – what will you make it say next? Whether designing educational tools or interactive art installations, remember: every complex creation starts with simple beeps. Keep experimenting, and soon you’ll orchestrate electronics like a maestro.