
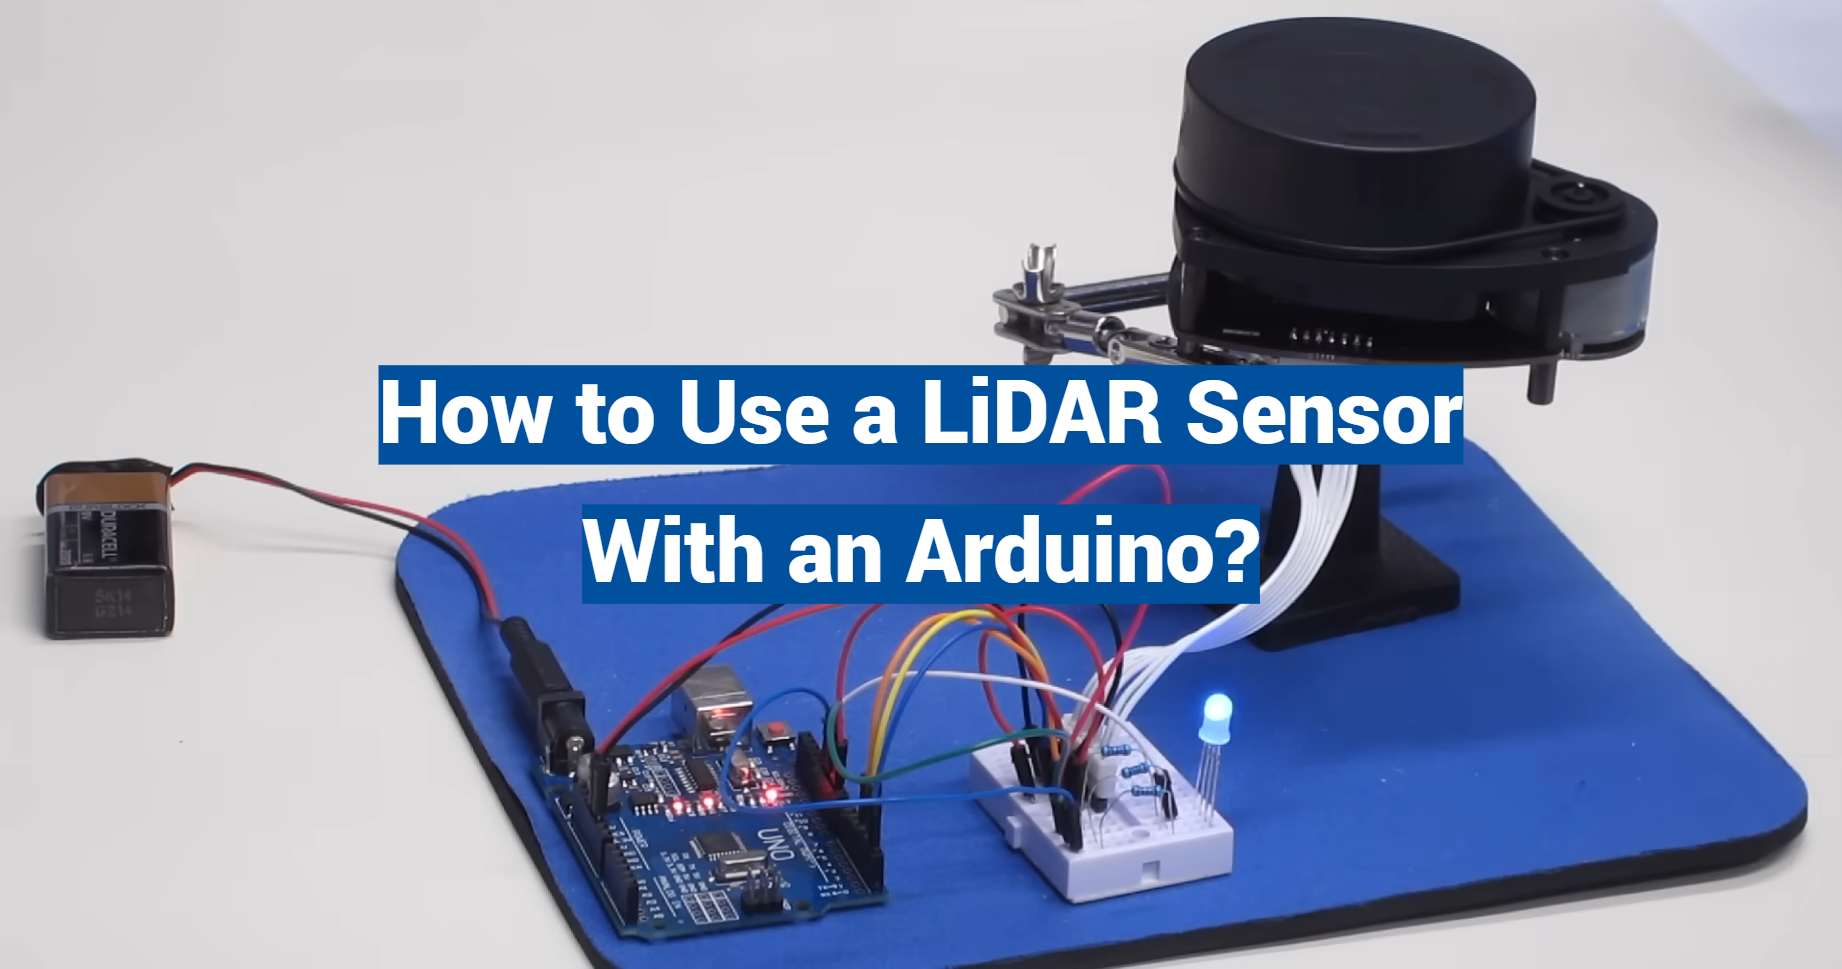
LiDAR, an acronym for Light Detection and Ranging, is a groundbreaking technology that has revolutionized various industries, from autonomous vehicles to archaeology. This article delves into the world of LiDAR sensors, explaining what they are, how they work, and the different types available.
We’ll also explore the exciting realm of LiDAR applications with Arduino, showcasing the endless possibilities this technology offers to hobbyists and professionals alike.
What Is LiDAR Sensor?
The Basics of LiDAR
LiDAR systems consist of a laser source, a scanner or mirror, and a receiver. The laser source emits a pulse of light, which travels outward, bounces off objects in its path, and returns to the receiver. By measuring the time it takes for the light to travel to the object and back, LiDAR can calculate the distance with remarkable precision.
Laser Light and LiDAR
The use of laser light is a key characteristic of LiDAR. Unlike other forms of remote sensing, such as radar (Radio Detection and Ranging), which uses radio waves, LiDAR’s laser-based approach allows for extremely high accuracy and resolution. This precision makes it an indispensable tool in a wide range of applications.
How Does LiDAR Work?
To understand LiDAR better, let’s delve into its operational principles:
Emission of Laser Pulses
LiDAR sensors emit laser pulses in short bursts. These pulses contain a vast amount of energy and are typically in the form of infrared light, which is invisible to the human eye. This property is advantageous as it minimizes interference with visible light and enhances detection accuracy.
Measurement of Return Time
Once the laser pulse is emitted, it travels through the air until it encounters an object. When it hits an object, it bounces back towards the LiDAR sensor. The sensor’s receiver then records the exact time it takes for the pulse to return. By knowing the speed of light and the time it took for the pulse to return, the LiDAR system calculates the distance to the object.
Scanning and Point Clouds
LiDAR sensors are not stationary; they are often mounted on vehicles, drones, or other platforms. To create a comprehensive 3D map of the environment, the LiDAR sensor rapidly scans its surroundings by emitting multiple laser pulses in different directions. These pulses bounce off various objects, creating a “point cloud” of data, which consists of countless individual distance measurements. These data points are then combined to construct a detailed 3D representation of the environment [2].
High Accuracy and Precision
One of LiDAR’s primary advantages is its exceptional accuracy and precision. It can measure distances with sub-centimeter accuracy, making it a crucial technology in applications where precision matters, such as autonomous vehicles, forestry, and archaeology.
Types Of LiDAR Sensors
LiDAR sensors come in various types, each tailored to specific applications.
Here are three common types:
Topographic LiDAR
Topographic LiDAR, also known as bathymetric LiDAR when used underwater, is commonly used in geology, cartography, and environmental science. It is designed to measure the elevation and terrain of the Earth’s surface. Topographic LiDAR sensors can penetrate water and vegetation to provide accurate elevation data, making them ideal for mapping coastlines, monitoring forests, and assessing landforms.
Metric LiDAR
Metric LiDAR sensors are often used in engineering and construction applications. They provide highly accurate distance measurements and are crucial for tasks like creating detailed digital elevation models (DEMs), monitoring structural changes in buildings, and conducting land surveys.
Terrestrial LiDAR
Terrestrial LiDAR sensors are designed for ground-based scanning. They are commonly used in archaeology, civil engineering, and forestry to capture high-resolution 3D data of objects, buildings, or natural landscapes. Terrestrial LiDAR systems are often mounted on tripods or vehicles and can capture detailed point cloud data from a fixed location.
Applications Of LiDAR Sensors With An Arduino
LiDAR Distance Measurement
One of the most straightforward and practical applications of LiDAR with Arduino is distance measurement. By connecting a LiDAR sensor to an Arduino board, you can easily measure distances between the sensor and objects in its field of view. This information can be used for a wide range of applications, from obstacle avoidance in robotics to creating interactive installations.
3D Scanning and Mapping
LiDAR sensors are excellent tools for creating detailed 3D scans of objects and environments. By integrating LiDAR with Arduino, you can build your own 3D scanning system. This DIY approach allows you to customize your scanning setup and experiment with different scanning techniques [3].
Drone and Autonomous Vehicle Navigation
Drones and autonomous vehicles heavily rely on LiDAR technology for navigation and obstacle avoidance. With Arduino, you can develop your own drone or autonomous vehicle navigation system using LiDAR sensors. This hands-on approach provides valuable insights into the challenges and complexities of autonomous systems.
Environmental Monitoring
LiDAR is widely used in environmental monitoring applications, such as forestry management and flood modeling. By combining LiDAR sensors with Arduino, you can create cost-effective monitoring solutions for tracking changes in forests, water levels, and terrain.
Augmented Reality (AR) and Virtual Reality (VR)
LiDAR sensors play a crucial role in AR and VR experiences by capturing 3D data of the real world. With Arduino, you can experiment with integrating LiDAR into AR and VR projects, enhancing the immersion and realism of virtual environments.
Art and Interactive Installations
Arduino has gained popularity in the art and maker communities for its accessibility and versatility. Artists and makers can use LiDAR sensors with Arduino to create interactive art installations that respond to the presence and movement of people in real time. This opens up a world of creative possibilities for blending technology and art.
Education and Learning
Using LiDAR sensors with Arduino is an excellent educational tool. It provides hands-on experience with cutting-edge technology and teaches valuable skills in electronics, programming, and data analysis. Educational institutions can use Arduino-based LiDAR projects to inspire students and spark interest in STEM (Science, Technology, Engineering, and Mathematics) fields.
How to Use TFMini-S LiDAR Distance Sensor With Arduino:
- Range: The TFMini-S has a range of up to 12 meters, making it suitable for various distance-measuring applications;
- Compact Size: It’s a compact and lightweight sensor, making it easy to integrate into your projects;
- UART Interface: The TFMini-S communicates with other devices, like Arduino, using a UART (Universal Asynchronous Receiver-Transmitter) interface, which is a common serial communication protocol;
- Voltage Requirement:It operates on a voltage range of 4.5V to 6V, making it compatible with most microcontrollers, including the Arduino;
Setting Up a TFMini-S Micro LiDAR Distance Sensor
1) Components Required
- TFMini-S LiDAR Distance Sensor;
- Arduino board (e.g., Arduino Uno or Arduino Nano);
- Jumper wires;
- USB cable for Arduino;
2) Connection Steps:
Connect Power:
- Connect the red wire (VCC) from the TFMini-S to the 5V output on the Arduino;
- Connect the black wire (GND) from the TFMini-S to one of the ground (GND) pins on the Arduino;
Connect Data:
- Connect the white wire (TX) from the TFMini-S to a digital pin on the Arduino (e.g., Pin 2);
3) Serial Communication:
- Open the Arduino IDE on your computer;
- Write code to establish serial communication with the TFMini-S using the chosen digital pin (e.g., Pin 2);
- You can use the SoftwareSerial library to create a software serial port [4];
4) Power Up:
Power up your Arduino by connecting it to your computer via USB or an external power source.
5) Upload Code:
Upload the code to your Arduino board.
6) Read Data:
Open the Serial Monitor in the Arduino IDE to view the distance measurements from the TFMini-S sensor.
7) Effective Detection Range
The TFMini-S LiDAR Distance Sensor has an effective detection range of up to 12 meters. This makes it suitable for a wide range of applications, from close-range obstacle detection to longer-distance measurements.
8) Communication Interfaces
The TFMini-S supports UART (Universal Asynchronous Receiver-Transmitter) communication, making it easy to interface with microcontrollers like Arduino. It communicates using serial data, allowing for straightforward integration into projects.
9) Detection Frequency
The TFMini-S operates at a detection frequency of 100 Hz, meaning it can provide distance measurements up to 100 times per second. This rapid response time makes it suitable for applications that require real-time data.
10) Input Power
The sensor operates on a supply voltage of 5V DC, which is compatible with most Arduino boards. Ensure that you connect it to a stable 5V power source to ensure accurate readings.
11) Logic Levels
The TFMini-S uses the TTL (Transistor-Transistor Logic) level for its communication. When connecting it to an Arduino, ensure that the logic levels match. Most Arduino boards operate at 5V, which is compatible with the TFMini-S.
Technical Specifications
Here are the key technical specifications of the TFMini-S LiDAR Distance Sensor:
- Range:Up to 12 meters;
- Communication Interface: UART (TTL);
- Detection Frequency: 100 Hz;
- Input Voltage: 5V DC;
- Output Data Rate:Adjustable (default is 100 Hz);
- Accuracy: ±6 cm (1% of the measured distance);
- Operating Temperature: -20°C to 60°C (-4F to 140F);
- Dimensions: 42 x 15 x 16 mm;
- Weight: 6.8 grams [5];
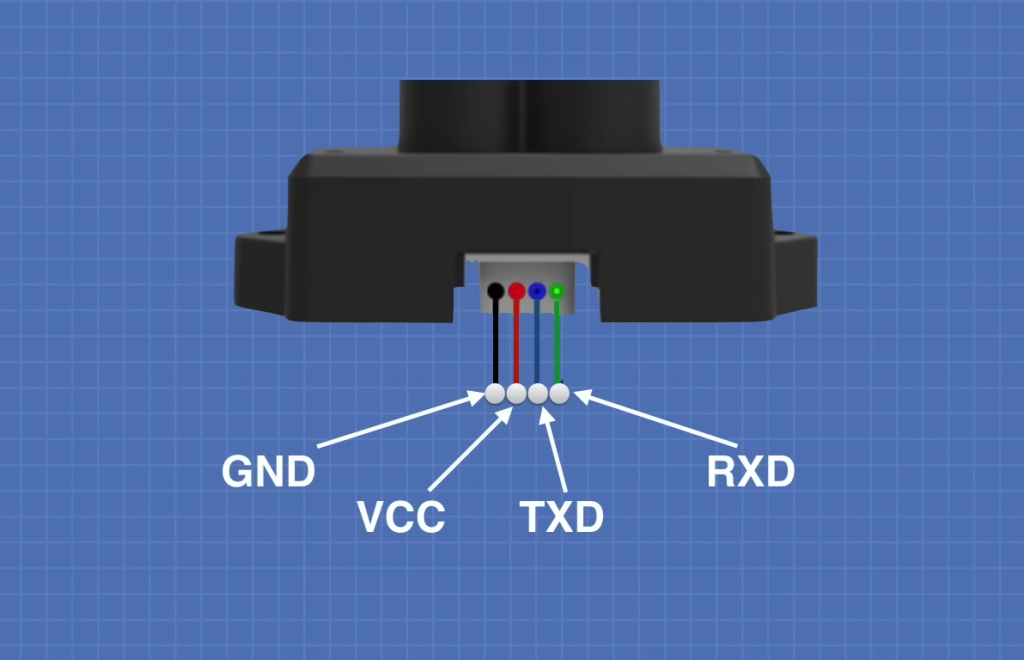
TFMini-S Pinout
The TFMini-S LiDAR Distance Sensor has three wires:
- Red (VCC):Connect to 5V for power;
- Black (GND):Connect to the ground (0V);
- White (TX):Connect to a digital pin for serial data transmission;
Applications
The TFMini-S LiDAR Distance Sensor can be used in a wide range of applications, including:
- Obstacle Detection: Use it in robotics and drones to detect obstacles and navigate safely;
- Gesture Recognition: Measure distances for gesture-based control systems;
- Terrain Mapping: Create 2D or 3D maps of environments for agriculture or surveying;
- Object Tracking: Track the movement of objects in real time;
- Inventory Management:Measure distances for inventory tracking and stockpile management;
- Industrial Automation: Integrate it into manufacturing processes for precise measurements;
- Safety Systems: Use it in safety applications to ensure clearance distances;
- Smart Devices:Incorporate it into smart devices for proximity sensing;
Interfacing TFMini-S Micro LiDAR Distance Sensor with Arduino
Interfacing TFMini-S with Arduino Using a Library
Follow these steps:
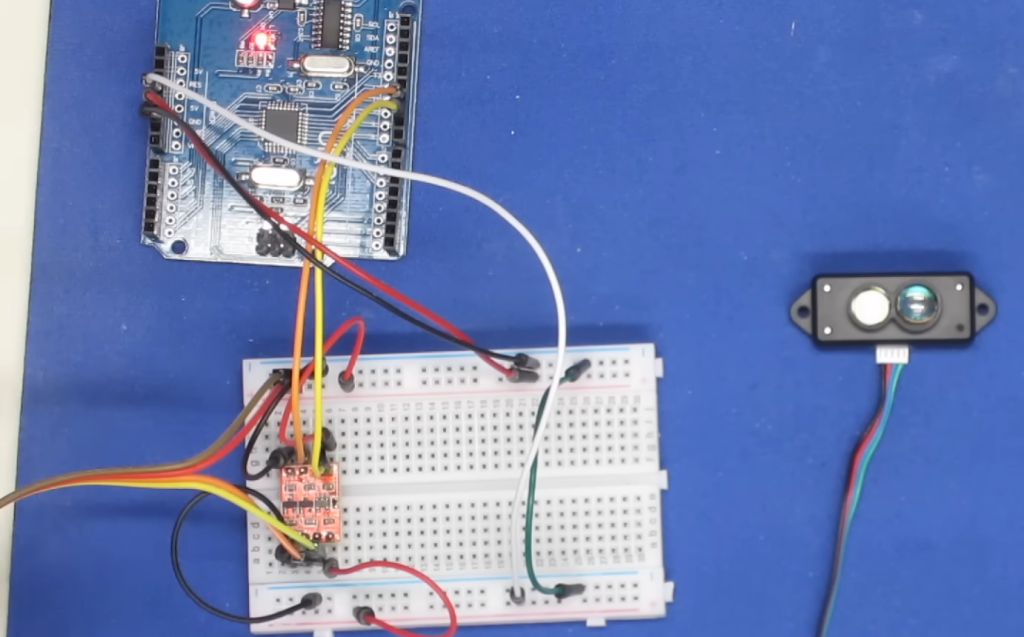
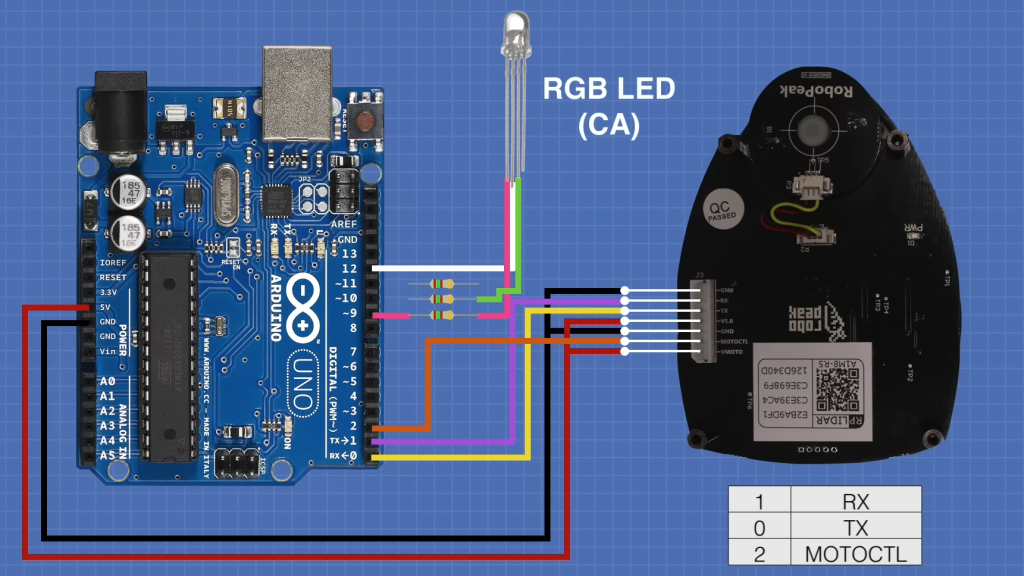
1) Wiring Connections
Connect the TFMini-S sensor to your Arduino as follows:
- VCC to 5V on Arduino;
- GND to GND on Arduino;
- TX to a digital pin on Arduino (e.g., D2);
- RX to a digital pin on Arduino (e.g., D3);
- Power up your Arduino;
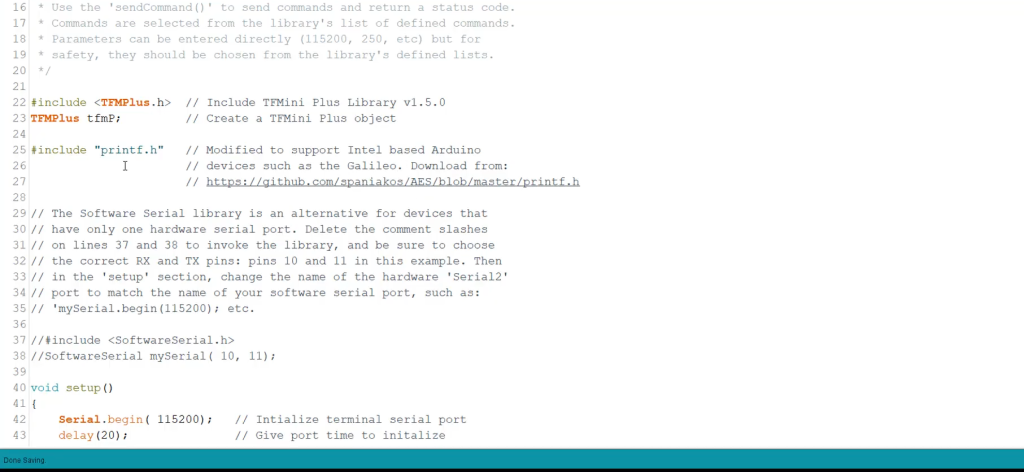
2) Install the “TFMini” library via the Arduino IDE Library Manager
Upload the following code to your Arduino:
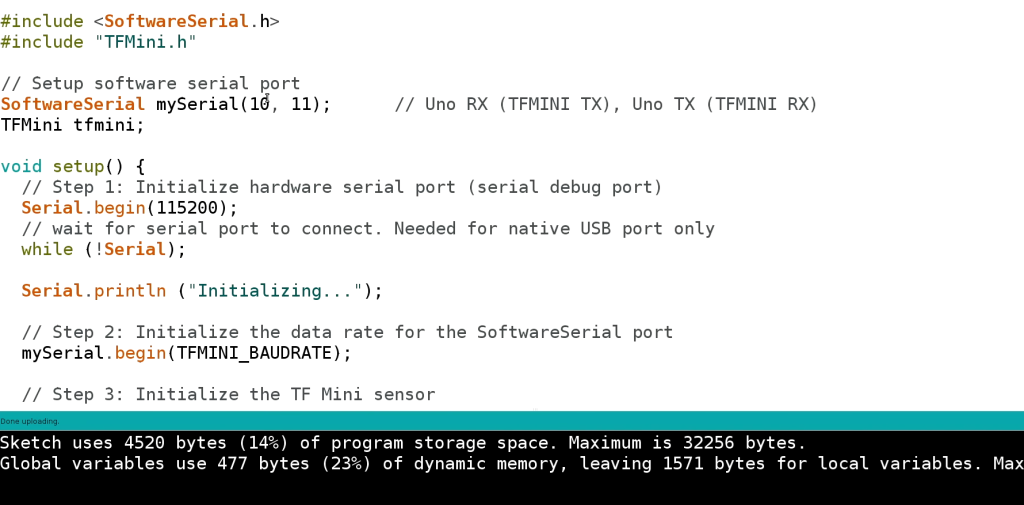
#include <SoftwareSerial.h>
#include <TFMini.h>
SoftwareSerial mySerial(2, 3); // RX, TX
TFMini tfmini;
void setup() {
Serial.begin(115200);
mySerial.begin(115200);
}
void loop() {
if (tfmini.begin(mySerial)) {
int distance = tfmini.getDistance();
if (distance > 0) {
Serial.print(“Distance: “);
Serial.println(distance);
} else {
Serial.println(“Failed to read distance data.”);
}
}
delay(100);
}
Open the Serial Monitor in the Arduino IDE (set baud rate to 115200), and you should see distance readings from the TFMini-S sensor [6].
Interfacing TFMini-S with Arduino Without a Library
If you prefer to interface the TFMini-S without using a library, you can do so by directly handling the serial communication.
Here’s a step-by-step guide:
1) Wiring Connections
Ensure that you have the same hardware connections as mentioned in the previous section.
2) Writing Code Without a Library
Open the Arduino IDE and create a new sketch.
Use the following code to interface with the TFMini-S without a library:
void setup() {
Serial.begin(115200);
Serial1.begin(115200); // TFMini-S communicates via Serial1
}
void loop() {
// Requesting distance measurement
Serial1.write(0x42);
Serial1.write(0x57);
// Read data
delay(100); // Delay to allow data to be received
while (Serial1.available() >= 9) {
if (Serial1.read() == 0x59) {
int distance = Serial1.read() + Serial1.read() * 256;
Serial.print(“Distance: “);
Serial.println(distance);
}
}
}
Upload this code to your Arduino.
Open the Serial Monitor (set baud rate to 115200), and you should see distance readings displayed.
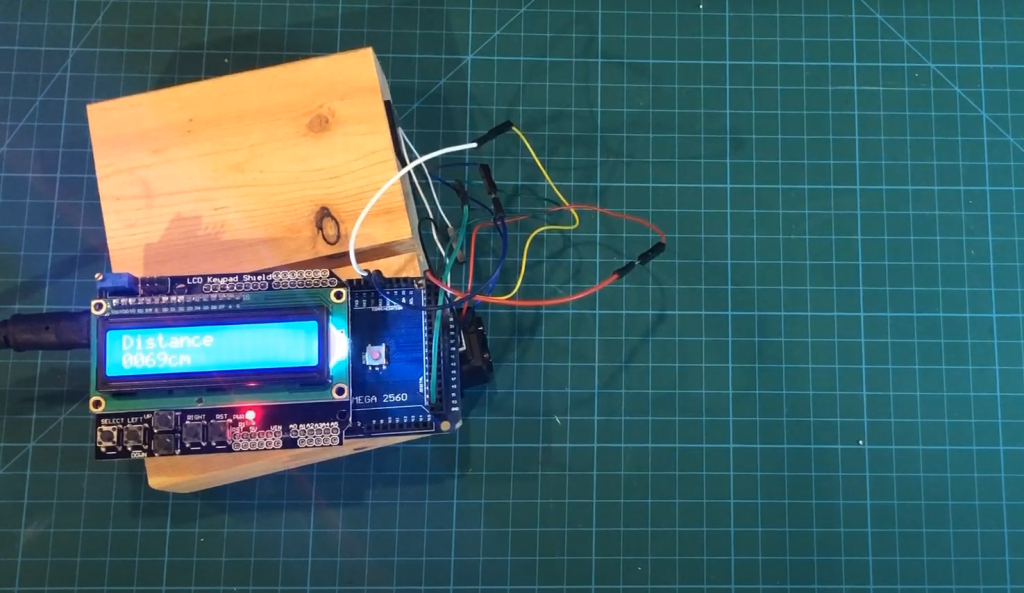
Using TFMini-S LiDAR Distance Sensor with Arduino & LCD Display
Now that you’ve successfully interfaced the TFMini-S with Arduino let’s take it a step further by adding an LCD display to visualize the distance readings in real-time.
1) Adding an LCD Display
Get an Arduino-compatible LCD display (e.g., 16×2 LCD).
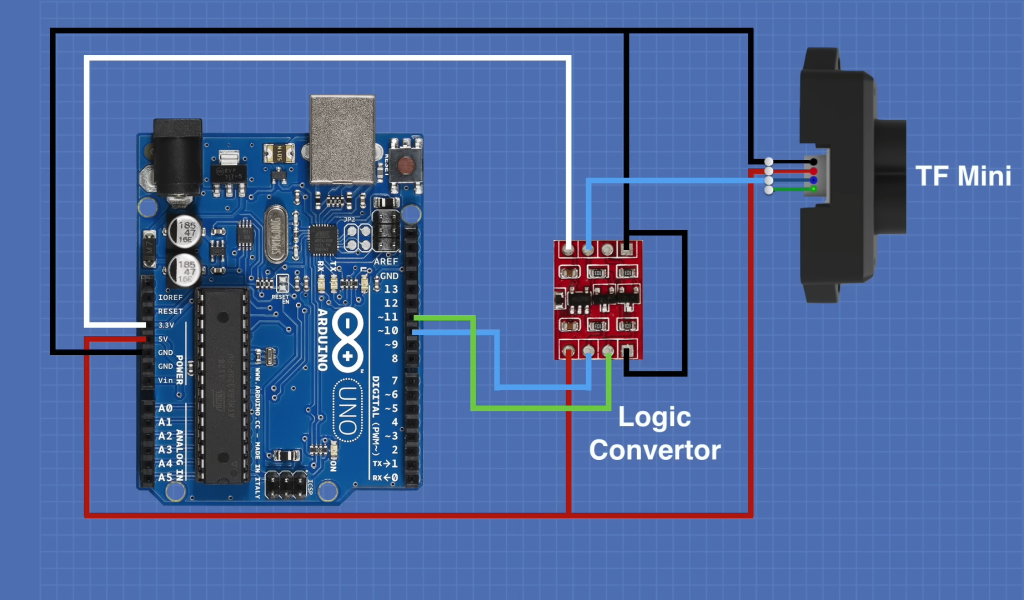
Wire the LCD display to your Arduino as follows:
- VCC to 5V on Arduino;
- GND to GND on Arduino;
- SDA to A4 on Arduino (for I2C communication);
- SCL to A5 on Arduino (for I2C communication);
- Install the “LiquidCrystal_I2C” library via the Arduino IDE Library Manager;
2) Modify the previous code (with library) to include LCD display support:
#include <SoftwareSerial.h>
#include <TFMini.h>
#include <LiquidCrystal_I2C.h>
SoftwareSerial mySerial(2, 3); // RX, TX
TFMini tfmini;
LiquidCrystal_I2C lcd(0x27, 16, 2); // Change address if necessary
void setup() {
Serial.begin(115200);
mySerial.begin(115200);
lcd.init(); // Initialize LCD
lcd.backlight(); // Turn on backlight
lcd.setCursor(0, 0);
lcd.print(“Distance (cm):”);
}
void loop() {
if (tfmini.begin(mySerial)) {
int distance = tfmini.getDistance();
if (distance > 0) {
lcd.setCursor(0, 1);
lcd.print(” “); // Clear the previous distance
lcd.setCursor(0, 1);
lcd.print(distance);
Serial.print(“Distance: “);
Serial.println(distance);
} else {
Serial.println(“Failed to read distance data.”);
}
}
delay(100);
}
Upload the modified code to your Arduino.
Now, you should see real-time distance readings displayed on the LCD screen.
FAQ:
Can you use LiDAR with Arduino?
Yes, you can use LiDAR (Light Detection and Ranging) sensors with Arduino. Many LiDAR sensors are compatible with Arduino boards and can be easily interfaced for various applications, such as distance measurement, mapping, and obstacle detection.
How to connect a LiDAR sensor to Arduino?
To connect a LiDAR sensor to Arduino, follow these general steps:
- Power Supply:Ensure that your LiDAR sensor is supplied with the correct voltage, typically within the specified operating range. Connect the sensor’s VCC and GND pins to the appropriate pins on your Arduino (5V and GND, respectively);
- Communication Interface: LiDAR sensors usually communicate using UART (serial), I2C, or SPI. Connect the sensor’s TX/RX pins (or SDA/SCL pins for I2C) to the corresponding pins on your Arduino;
- Arduino Programming: Write Arduino code to communicate with the LiDAR sensor. Depending on the sensor and interface used, you may need to install and use specific libraries for proper communication;
- Data Handling: In your Arduino code, read data from the LiDAR sensor and process it as needed for your application;
How accurate is LiDAR on Arduino?
The accuracy of LiDAR on Arduino depends on several factors, including the quality of the LiDAR sensor, its specifications, and the environment in which it operates. High-quality LiDAR sensors can provide millimeter-level accuracy for distance measurements. However, the accuracy may degrade in adverse conditions, such as fog or heavy rain.
Additionally, the accuracy can be affected by the quality of the sensor’s calibration and the precision of the data processing in your Arduino code.
What is the range of the LiDAR sensor on Arduino?
The range of a LiDAR sensor on Arduino can vary widely depending on the specific sensor model. However, many LiDAR sensors designed for Arduino projects range from a few meters to several dozen meters. The TFMini-S, for example, has a range of up to 12 meters.
It’s essential to choose a LiDAR sensor with a range that suits your application’s requirements.
What is the longest range of LiDAR sensors?
LiDAR sensors can have varying ranges depending on their intended use. The longest-range LiDAR sensors used in industrial or automotive applications can have ranges of over 100 meters (328 feet). These sensors are typically more expensive and sophisticated than those commonly used in Arduino projects. The choice of the longest-range LiDAR sensor would depend on your specific application and budget.
How far can LiDAR detect?
LiDAR sensors can detect objects at different distances, depending on their specifications. Entry-level LiDAR sensors may have a range of a few meters, while high-end LiDAR sensors can detect objects at distances exceeding 100 meters (328 feet). The detection range is a crucial consideration when choosing a LiDAR sensor for your project, as it determines its suitability for specific applications.
What can LiDAR not detect?
LiDAR is a versatile technology but has limitations. LiDAR sensors cannot reliably detect certain objects or features, such as:
- Clear Glass: Transparent or highly reflective surfaces like clear glass can be challenging for LiDAR to detect accurately;
- Liquid Surfaces: Liquid surfaces, such as water, can reflect and absorb laser beams, making it difficult for LiDAR to measure distances accurately;
- Very Small Objects:Extremely small or thin objects may not reflect enough laser light to be detected by LiDAR;
- Certain Materials: Highly absorbent materials or materials with low reflectivity may not provide reliable LiDAR measurements;
Can LiDAR work without GPS?
Yes, LiDAR can work independently of GPS. LiDAR sensors measure distances by emitting laser pulses and measuring the time it takes for the laser light to bounce back, making them self-contained for distance measurement. GPS is often used in conjunction with LiDAR data to georeference the acquired data, but it is not a requirement for basic LiDAR functionality.
How do I get data from my LiDAR sensor?
To get data from your LiDAR sensor, you need to connect it to a microcontroller like Arduino, Raspberry Pi, or a dedicated LiDAR processing unit. You’ll then write code to communicate with the sensor and read the data it provides. Depending on the sensor’s interface, you may use UART, I2C, or SPI communication protocols to obtain distance measurements or point cloud data, which can be further processed for various applications.
Is LiDAR data-free?
LiDAR data is not typically free. Obtaining LiDAR data often involves using sensors that can be expensive, or you may need to purchase data collected by others. Government agencies, research institutions, and companies may provide LiDAR data for specific regions, but access to such data may require licenses or fees.
Is LiDAR a sensor or scanner?
LiDAR can be both a sensor and a scanner, depending on how it is used. As a sensor, it measures distances to objects by emitting laser pulses and measuring the time it takes for the light to return. As a scanner, it can be mounted on a rotating platform or moving vehicle to capture a 360-degree view of the environment, creating a point cloud or 3D map of the surroundings.
How to process LiDAR data?
Processing LiDAR data involves several steps, including data acquisition, point cloud registration, filtering, segmentation, and feature extraction. Specialized software tools and libraries, such as Python’s open3d or CloudCompare, are often used for LiDAR data processing. The specific processing steps depend on the application, whether it’s for mapping, object detection, or terrain modeling.
Is LiDAR a remote sensor?
LiDAR is considered a remote sensing technology because it can collect data from a distance without physical contact with the objects or terrain being measured. It uses laser beams to remotely measure distances and capture detailed information about the environment.
What are the three primary components of a LiDAR system?
A typical LiDAR system consists of three primary components:
- Laser Emitter: This component emits laser pulses or beams of light toward the target. It is responsible for illuminating objects in the environment;
- Receiver: The receiver detects the reflected laser light and measures the time it takes for the light to return. It also records the intensity of the reflected light;
- Control and Data Processing Unit: This unit controls the timing and operation of the laser emitter and receiver. It processes the data received from the receiver to calculate distances, angles, and other relevant information. In some systems, this unit may also include GPS and inertial measurement units for georeferencing and orientation;
Is LiDAR 100% accurate?
LiDAR is highly accurate for distance measurement and 3D mapping, but its accuracy can be affected by various factors, including sensor quality, environmental conditions, and data processing. High-quality LiDAR sensors can provide millimeter-level accuracy under ideal conditions, but in real-world scenarios, accuracy may vary. Calibration, data filtering, and error correction techniques are often used to enhance accuracy.
Who invented LiDAR?
LiDAR technology was developed over several decades by multiple researchers and engineers. The concept of LiDAR dates back to the early 1960s when researchers like Hughes Aircraft Company’s Robert M. Huff and Stanford University’s Charles W. B. Boyle explored the use of laser-based distance measurement. LiDAR technology has since evolved and been adapted for various applications, including remote sensing, surveying, and autonomous vehicles.
Can LiDAR be hacked?
LiDAR sensors themselves are not typically vulnerable to hacking in the traditional sense, as they are passive sensors that emit laser pulses and receive reflections. However, the data transmitted from LiDAR sensors to processing units or systems may be susceptible to hacking or tampering if proper security measures are not in place to protect the data transmission and storage.
Can LiDAR work in low light?
LiDAR can operate in low light conditions because it emits its own laser light source to measure distances, making it less dependent on ambient light than some other sensing technologies. However, extremely low light conditions or total darkness can still pose challenges for LiDAR systems, as they may have difficulty detecting objects with low reflectivity.
What is the most powerful LiDAR sensor?
The term “most powerful” can vary depending on the context of LiDAR sensors. In the realm of autonomous vehicles, some of the most advanced LiDAR sensors come from companies like Velodyne and Luminar. These sensors offer high-resolution 3D mapping and long-range capabilities, making them suitable for demanding applications. The choice of the most suitable LiDAR sensor depends on the specific requirements of the application.
What is the lifespan of LiDAR?
The lifespan of a LiDAR sensor can vary depending on several factors, including its quality, usage conditions, and maintenance. High-quality industrial LiDAR sensors can have a long lifespan, potentially lasting for many years of continuous operation.
However, like any electronic device, LiDAR sensors can degrade over time, and their lifespan may be influenced by factors such as exposure to harsh environments, wear and tear, and electrical or mechanical failures. Proper maintenance and care can extend the lifespan of LiDAR sensors.
Useful Video: Getting Started with LIDAR
References:
- https://www.engineersgarage.com/how-to-use-a-lidar-sensor-with-arduino/
- https://www.diyengineers.com/2022/06/02/lidar-how-to-use-with-arduino/
- https://how2electronics.com/how-to-use-tfmini-s-lidar-distance-sensor-with-arduino/
- https://lastminuteengineers.com/tfmini-s-lidar-sensor-arduino-tutorial/
- https://www.electroniclinic.com/what-is-lidar-lidar-working-tf-mini-lidar-with-arduino-connection-code/
- https://www.reddit.com/r/AskElectronics/comments/xcw861/can_i_hook_up_an_iphone_lidar_sensor_to_an_arduino/