
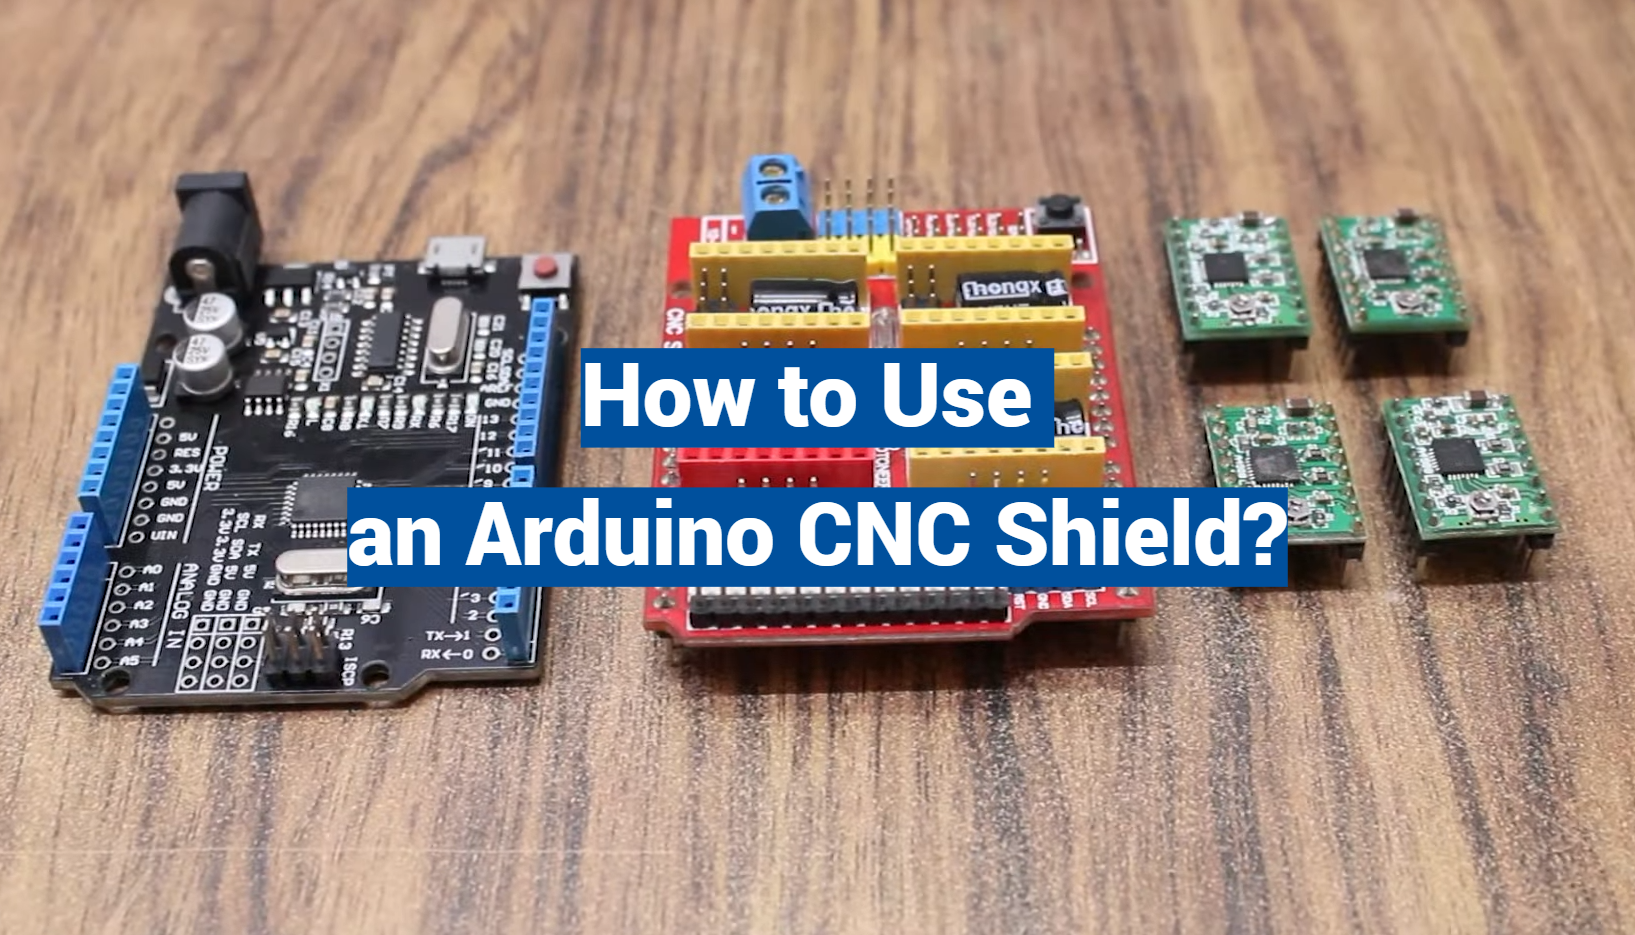
In the realm of computer numerical control (CNC), Arduino CNC Shields have emerged as a popular tool for hobbyists and professionals alike. This article will guide you through the complexities of using an Arduino CNC Shield, a device that simplifies the process of connecting stepper drivers to the Arduino, thus enabling precise machine control.
Our walkthrough will cover everything from the initial setup to advanced operations, with an emphasis on practical, real-world applications. Whether you are exploring CNC for a personal project or professional work, this comprehensive guide is designed to empower you with the knowledge you need to succeed.
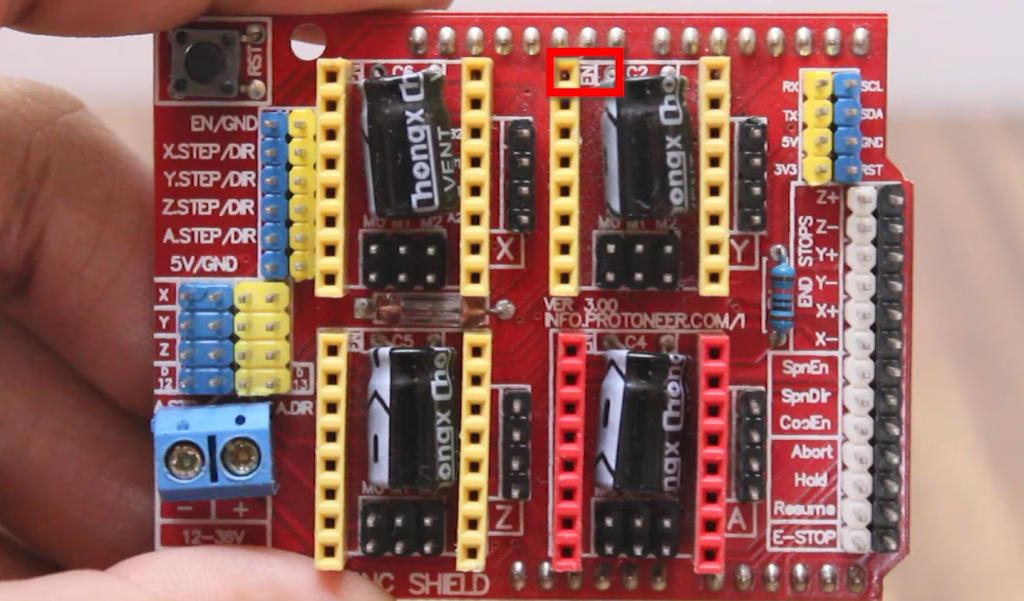
What Is A CNC Shield?
Before diving deeper into CNC shields, let’s briefly review the Arduino microcontroller. Arduino is an open-source platform that has gained immense popularity for its flexibility and ease of use in various electronic projects. However, on its own, an Arduino lacks the necessary hardware and circuitry to control CNC machines, which is where CNC shields come into play.
Key Components of a CNC Shield
A typical CNC shield comprises several key components that facilitate its function:
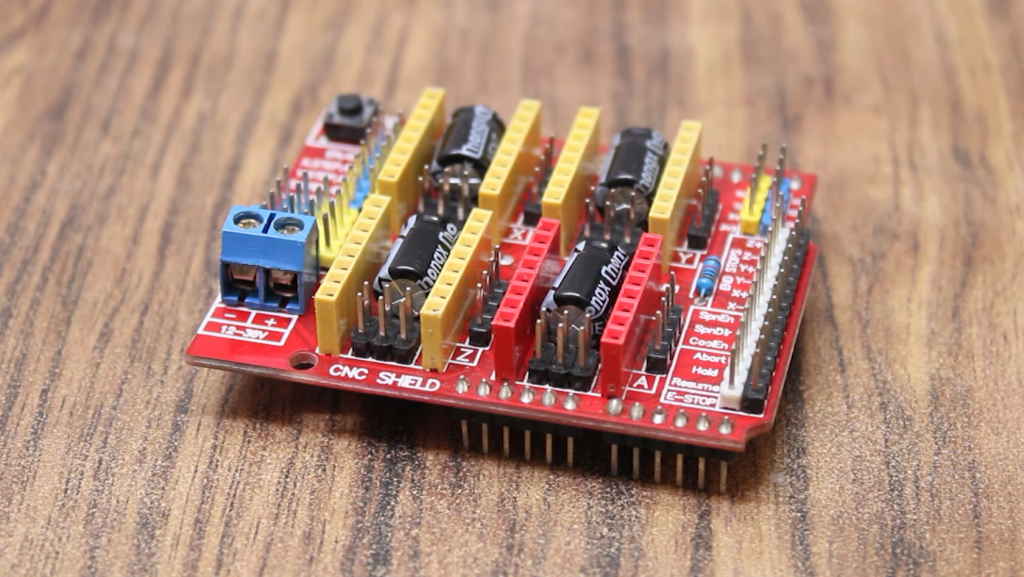
- Motor Drivers: These are integrated circuits responsible for driving the motors of the CNC machine. They interpret the signals from the Arduino and translate them into precise movements;
- Input/Output Pins: CNC shields come equipped with input and output pins, allowing you to connect sensors, switches, and other peripherals for extended functionality;
- Stepper Motor Connectors: Stepper motors are commonly used in CNC machines due to their precision and control. CNC shields include connectors for these motors, making it easier to set up your machine;
- Power Supply Connectors: To ensure that your CNC machine receives the appropriate power, CNC shields include connectors for connecting power sources and distributing power to the various components;
- Cooling Systems: Some advanced CNC shields incorporate cooling systems to prevent overheating during prolonged use, ensuring stable performance;
Now that we have a basic understanding of what a CNC shield is, let’s explore the reasons why you might need one.
Why Do You Need A CNC Shield?
Enhancing Control and Precision
One of the primary reasons for using a CNC shield is to enhance control and precision in your CNC projects. Arduino boards, on their own, lack the hardware necessary to control the movement of motors and other CNC components with the required accuracy. CNC shields bridge this gap by providing motor drivers that can interpret the signals sent by the Arduino and convert them into precise movements [2].
Compatibility and Flexibility
CNC shields are designed to be compatible with various CNC machines and can be used with different types of motors, such as stepper and servo motors. This flexibility allows you to adapt your CNC setup to the specific needs of your project. Whether you’re working on a 3D printing project that requires intricate layering or a CNC milling project that demands precise cutting, a CNC shield can be configured to suit your needs.
Streamlined Wiring and Connectivity
Without a CNC shield, connecting and configuring all the components of a CNC machine can be a complex and time-consuming task. CNC shields simplify this process by providing a standardized interface with labeled connectors. This means you can easily connect motors, sensors, and other peripherals without needing extensive knowledge of electronics or wiring.
Safety and Reliability
CNC shields often include safety features like overcurrent protection and thermal shutdown. These features help protect your CNC machine from damage due to power fluctuations or overheating. Additionally, using a CNC shield can reduce the risk of electrical interference or noise that can affect the precision of your CNC machine’s movements.
Cost-Efficiency
Building a custom CNC controller from scratch can be a costly endeavor, especially if you need to purchase individual components like motor drivers, power supplies, and connectors. CNC shields are designed as cost-effective solutions, providing all the necessary components in one package. This can significantly reduce the overall cost of your CNC project.
Open-Source Community
Another advantage of using a CNC shield is the vibrant open-source community surrounding Arduino and CNC technology. You can find a wealth of resources, tutorials, and libraries developed by enthusiasts and professionals alike. This community support can be invaluable when troubleshooting issues or expanding the capabilities of your CNC setup.
How Do Arduino CNC Shields Work?
Signal Processing and Motor Control
The fundamental operation of an Arduino CNC shield revolves around signal processing and motor control. When you send a command from your computer to the Arduino microcontroller, the Arduino processes this command and sends it to the CNC shield. The CNC shield, in turn, interprets the command and uses its motor drivers to control the movement of the CNC machine’s motors.
Stepper Motor Control
For CNC machines that employ stepper motors, the CNC shield plays a crucial role in ensuring precise control. Stepper motors are known for their ability to move in discrete steps, making them ideal for applications requiring accuracy. The CNC shield sends pulses to the stepper motors, with each pulse corresponding to a specific step. By controlling the timing and sequence of these pulses, the CNC shield can precisely position the motor shaft and, consequently, the tool or workpiece.
Smooth Motion with Grbl
Many CNC shields for Arduino use Grbl firmware, a popular choice for CNC control. Grbl is an open-source firmware specifically designed for controlling CNC machines [3]. It interprets G-code commands, a standard language for describing CNC toolpaths, and converts them into motor movements. Grbl is known for its ability to provide smooth and accurate motion control, making it a preferred choice for CNC enthusiasts.
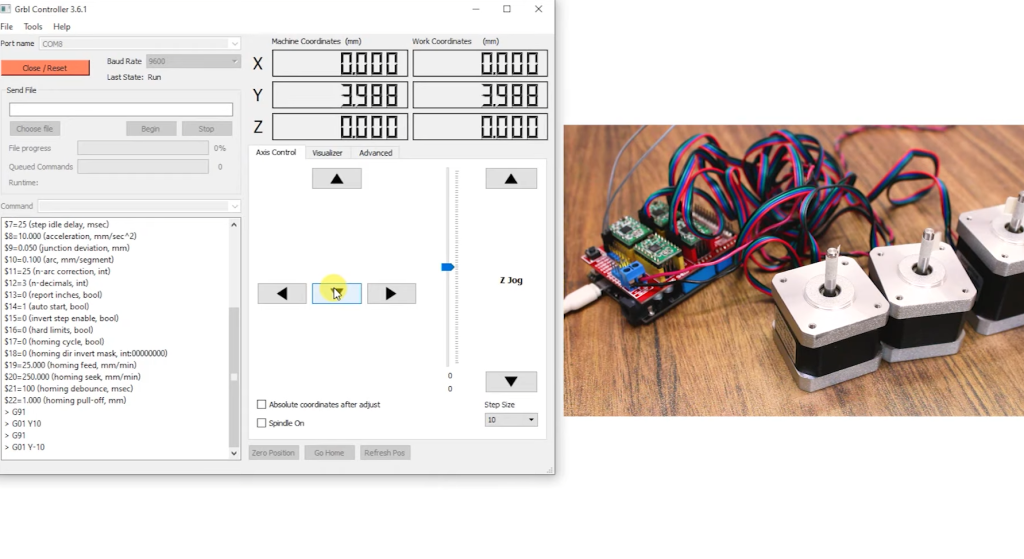
Integration with CNC Software
To operate a CNC machine effectively, you’ll need CNC software that generates G-code instructions. CNC software packages like GRBL Controller, Universal Gcode Sender, or even Fusion 360 CAM generate the G-code required for your CNC machine. The Arduino with the CNC shield then takes these G-code instructions and executes them, translating them into physical movements of the machine.
Calibration and Configuration
To ensure precise CNC operations, the CNC shield often requires calibration and configuration. This involves setting parameters such as steps per millimeter for each axis, motor current limits, and acceleration values. Proper calibration ensures that your CNC machine moves accurately and consistently, producing the desired results.
Safety Features
Many CNC shields come equipped with safety features to protect your machine and workpiece. These features include overcurrent protection, which prevents the motors from drawing too much current and overheating. Thermal shutdown mechanisms can also kick in if the temperature of the motor drivers exceeds safe levels, preventing damage to the components.
Expansion Possibilities
CNC shields are not limited to motor control. They often include additional input and output pins that allow you to expand your CNC setup. For instance, you can connect limit switches to prevent the machine from over-traveling, add a spindle control for precise speed adjustments, or incorporate sensors for automated tool changes.
Using an Arduino CNC Shield:
Materials
- Arduino Board: The heart of your CNC control setup, an Arduino board serves as the brains behind the operation;
- CNC Shield: This is the star of the show. Your CNC shield acts as the bridge between the Arduino and your CNC machine’s components;
- CNC Machine: Whether it’s a 3D printer, laser engraver, or milling machine, you’ll need a CNC machine that’s compatible with your CNC shield;
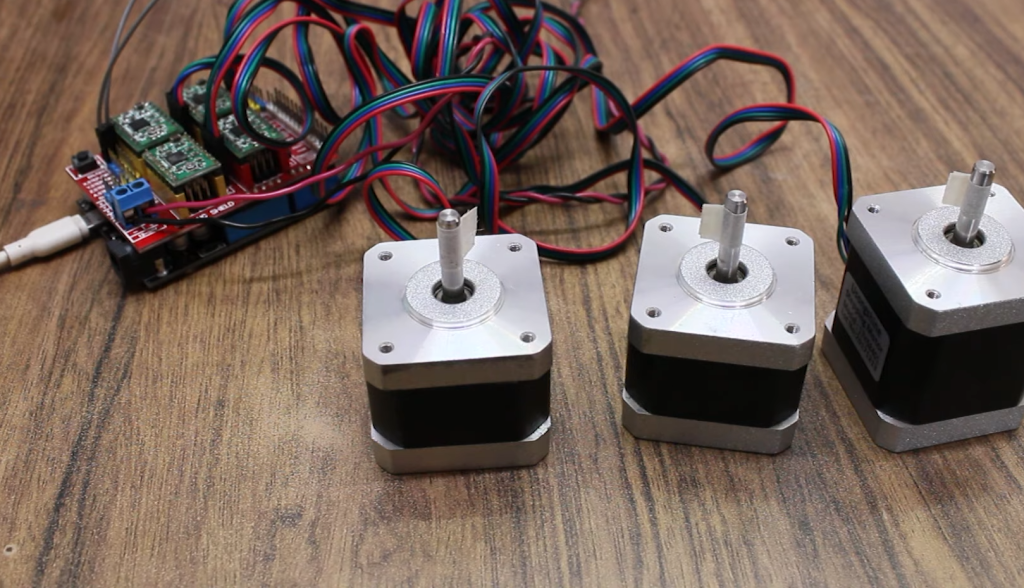
- Stepper Motors: Most CNC applications rely on stepper motors for precise control of movement. Make sure you have the appropriate stepper motors for your project;
- Power Supply: An adequate power supply unit is essential to provide power to both your CNC shield and CNC machine;
- Computer: You’ll require a computer to create and send G-code instructions to your Arduino and CNC shield;
- CNC Software: Utilize CNC software like GRBL Controller or Universal Gcode Sender to generate G-code instructions for your CNC machine;
Principle of Operation
At its core, the operation of an Arduino CNC Shield can be broken down into several key steps:
- G-code Generation: Using CNC software on your computer, you create a digital design or specify toolpaths. The software translates your design into G-code instructions, which represent the precise movements the CNC machine needs to execute;
- Arduino and CNC Shield Setup: Connect your Arduino board and CNC shield to your computer using a USB cable. Ensure that your CNC shield is correctly interfaced with your CNC machine’s components, including stepper motors and sensors;
- G-code Transfer: Upload the generated G-code to your Arduino through the computer using the Arduino IDE or other compatible software. The Arduino processes and stores the G-code instructions;
- Execution: Once the G-code is stored, you initiate the CNC machine’s operation. The Arduino reads the G-code instructions and communicates with the CNC shield;
- Motor Control: The CNC shield plays a pivotal role here. It interprets the G-code instructions and controls the stepper motors accordingly. Each pulse sent to the motors corresponds to a specific movement or step, allowing for precise control;
- Feedback and Sensors: Many CNC applications include sensors for feedback. The CNC shield can interface with these sensors, enabling features like auto-leveling or tool changes [4];
Scheme
To get a visual understanding of how these components interconnect, consider the following simplified scheme:
In this scheme:
- The Arduino board is connected to your computer via USB;
- The CNC shield interfaces with the Arduino, stepper motors, and power supply;
- Stepper motors control the movement of the CNC machine;
- Sensors can be integrated for additional functionality;
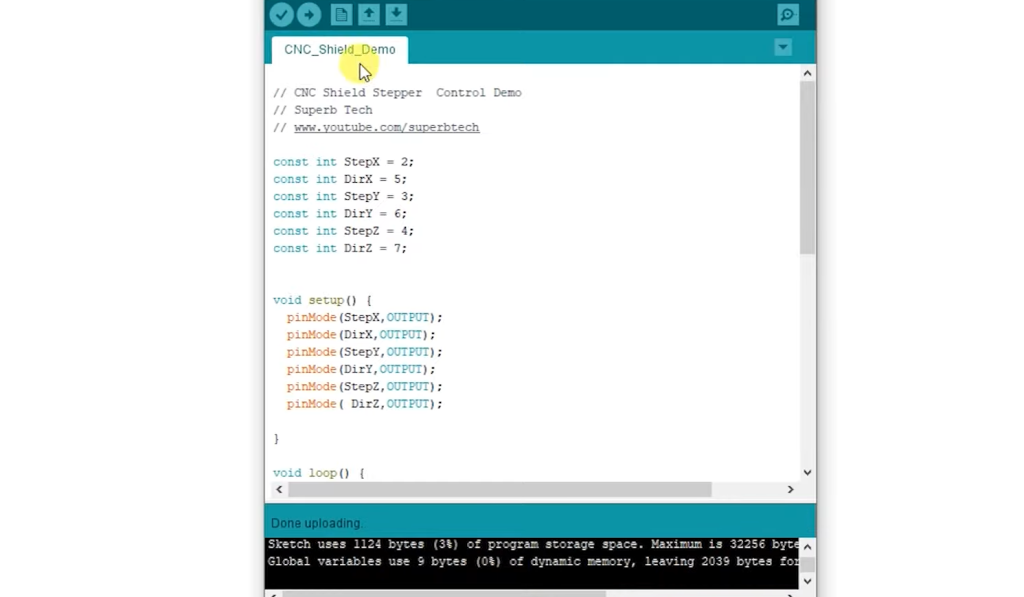
Code
The code for operating an Arduino CNC Shield largely depends on the specific CNC software and firmware you’re using. Here’s a simplified example of what the code might look like:
#include
// Define the number of steps per revolution for your stepper motors
const int stepsPerRevolution = 200;
// Create a Stepper object for each motor, specifying the pins
Stepper motor1(stepsPerRevolution, 2, 3); // Step and direction pins for motor 1
Stepper motor2(stepsPerRevolution, 4, 5); // Step and direction pins for motor 2
void setup() {
// Initialize the serial communication
Serial.begin(9600);
}
void loop() {
// Read G-code instructions from the computer
if (Serial.available()) {
String command = Serial.readStringUntil(‘\n’);
// Process and execute the G-code command
if (command.startsWith(“G1”)) {
// Parse G-code command and move motors accordingly
// Example: G1 X100 Y50 Z10 (Move to X=100, Y=50, Z=10)
}
}
}
Result
The result of using an Arduino CNC Shield is precise, computer-controlled motion of your CNC machine. Depending on your project and setup, this could mean 3D printing intricate designs, laser engraving detailed patterns, or milling precise shapes from various materials. The result is limited only by your creativity and the capabilities of your CNC machine [5].
Applications
The versatility of an Arduino CNC Shield opens the door to a wide range of applications:
- 3D Printing: Create intricate 3D objects with precision, layer by layer;
- Laser Engraving/Cutting: Etch designs or cut materials like wood, acrylic, or leather with extreme accuracy;
- CNC Milling: Produce custom parts, prototypes, or artistic creations by precisely removing material from a workpiece;
- PCB Prototyping: Fabricate custom printed circuit boards (PCBs) for electronics projects;
- Art and Sculpture: Craft intricate sculptures and art pieces using CNC-driven tools;
- Automated Production: Implement CNC machines for small-scale automated manufacturing;
- Educational Purposes: Learn about CNC technology, programming, and electronics through hands-on projects;
How to Choose a CNC Shield For Your Arduino:
Stepper Drivers
Stepper motors are the workhorses of most CNC machines. These motors move in precise, incremental steps, making them ideal for applications that require accuracy and control. When selecting a CNC shield, it’s essential to ensure compatibility with your chosen stepper motors. Stepper drivers are the components on the CNC shield responsible for driving these motors.
Stepper Driver Types:
- Allegro A4988 and DRV8825: These are cost-effective and widely used stepper drivers. They provide reliable performance for many CNC applications. However, they might not be suitable for high-current or high-speed applications;
- Trinamic TMC2xxx Series: These drivers are known for their advanced features, including quieter operation and more advanced current control. They are often favored for high-performance and noise-sensitive applications;
Considerations for Stepper Drivers
- Motor Compatibility: Ensure that the stepper drivers on your CNC shield are compatible with the current and voltage requirements of your stepper motors;
- Microstepping: Check if the stepper drivers support microstepping. Microstepping allows for smoother and more precise motor movements;
- Current Adjustment: Look for drivers that offer easy current adjustment. This feature allows you to fine-tune the current supplied to the stepper motors, optimizing performance and reducing heat generation [6];
Voltage and Current Rating
Powering Your CNC Shield
Voltage and current ratings play a pivotal role in determining the performance of your CNC shield and, by extension, your CNC machine.
Here’s what you need to consider:
- Voltage Compatibility: Ensure that the CNC shield is compatible with the voltage supplied by your power source. Most CNC shields operate at 12V or 24V, but this can vary;
- Current Capacity: Different CNC shields can handle varying levels of current. Check the current rating to ensure it can supply the necessary power to your stepper motors and other components. Consider both the continuous current rating and the peak current handling capability;
- Heat Dissipation: High current levels can generate heat. Look for CNC shields with good heat dissipation features to prevent overheating during extended operation;
Input/Output Ports
Expanding Your CNC Setup
The input/output (I/O) ports on a CNC shield allow you to connect additional components and sensors to your CNC system.
Depending on your project’s complexity and requirements, you may need various I/O options:
- End Stops and Limit Switches: These sensors help prevent over-travel and collisions by signaling the machine to stop when certain limits are reached. Ensure your CNC shield has dedicated ports for these sensors;
- Spindle Control: If your CNC machine includes a spindle for cutting or engraving, make sure the CNC shield supports spindle control. This allows you to adjust the spindle’s speed and turn it on/off as needed;
- Coolant Control: Some CNC applications require a coolant system to prevent overheating. Ensure your CNC shield offers ports for controlling coolant pumps and fans;
- Additional Sensors: Depending on your project, you might want to integrate other sensors, such as temperature sensors or tool change sensors. Ensure there are available I/O ports for these customizations;
Best Arduino CNC Shields (GRBL Compatible):
1. Open Source V3.51 CNC Shield
Highlights:
- GRBL Compatibility: This shield is designed with GRBL compatibility in mind, making it easy to implement and work with GRBL firmware;
- Expandable: It offers plenty of I/O options, including support for limit switches and spindle control, allowing for a more versatile CNC setup;
- Ease of Use: Designed for straightforward installation and configuration, making it suitable for both beginners and experienced CNC enthusiasts;
2. Ooznest Arduino CNC Shield
Highlights:
- Robust Design: Known for its durability and build quality, the Ooznest CNC shield is designed to withstand the demands of CNC machining;
- Compatibility: It’s compatible with various Arduino boards, including the popular Arduino Uno, and it works seamlessly with GRBL firmware;
- Versatile: Offers support for multiple stepper motors, making it suitable for various CNC applications [7];
3. Keyestudio V4.0 CNC Shield
Highlights:
- User-Friendly: The Keyestudio V4.0 CNC shield is known for its user-friendly design, making it an excellent choice for those new to CNC projects;
- GRBL Support: It’s fully compatible with GRBL firmware, ensuring reliable CNC control and precise movements;
- Affordable: Offers a cost-effective solution for CNC hobbyists without compromising on performance;
4. Synthetos gShield V5
Highlights:
- Compact Design: The gShield V5 boasts a compact form factor while providing all the essential features for CNC control;
- Performance: It’s designed to deliver high-performance CNC control, making it suitable for a wide range of CNC applications;
- Community Support: Benefit from a strong community of users and developers, ensuring access to a wealth of resources and expertise;
5. GRBLDuino Uno Shield
Highlights:
- Dedicated to GRBL: As the name suggests, the GRBLDuino Uno Shield is tailored specifically for GRBL firmware, ensuring seamless compatibility and ease of use;
- Precision Control: Designed to provide precise control over stepper motors, allowing for intricate CNC work;
- Cost-Efficient: Offers a budget-friendly solution for those looking to embark on CNC projects without breaking the bank;
6. Kuman CNC Shield Kit
Highlights:
- Comprehensive Kit: The Kuman CNC Shield Kit comes with all the components you need to set up a CNC machine, including a CNC shield, stepper drivers, and even a heatsink;
- GRBL Support: Designed to work seamlessly with GRBL firmware, ensuring reliable CNC control;
- Value for Money: Provides excellent value for those seeking an all-in-one CNC solution;
CNC Shield Alternatives For Arduino
While CNC shields are popular choices for controlling CNC machines with an Arduino, there are also alternative methods and components to consider, depending on your specific needs and preferences.
Here are some CNC shield alternatives for Arduino-based CNC control:
1) Raspberry Pi CNC Control
Instead of using an Arduino, you can opt for a Raspberry Pi-based CNC control system. Raspberry Pi boards are powerful and versatile, making them suitable for running CNC software like LinuxCNC or MachineKit. You’ll need additional stepper motor drivers, such as the popular Pololu DRV8825 or TB6600, to interface with the Raspberry Pi GPIO pins.
Pros:
- Raspberry Pi boards offer more computing power and can handle complex CNC tasks;
- Access to a wide range of CNC software options;
- Integration with network and internet capabilities for remote control;
Cons:
- Higher cost compared to basic Arduino setups;
- Steeper learning curve, especially for beginners;
2) GRBL ESP32 Controller
The GRBL firmware can also run on ESP32 microcontrollers, offering a compact and efficient CNC control solution. You can use an ESP32 development board, such as the NodeMCU ESP-32S, to run GRBL firmware. This approach allows for wireless control of your CNC machine through a web interface [8].
Pros:
- Compact and wireless CNC control;
- Suitable for projects where space is limited;
- Web-based control interface for convenience;
Cons:
- Limited I/O pins compared to Arduino, limiting the number of connected components;
- May require additional hardware, such as motor drivers and power supplies;
3) Smoothieboard
The Smoothieboard is a dedicated CNC and 3D printer controller that combines the functionality of an Arduino-based CNC shield with more advanced features. It runs the Smoothie firmware, offering precise control and flexibility for CNC applications. Smoothieboards come in various versions, such as the popular Smoothieboard 5X.
Pros:
- Advanced features, including support for multiple extruders and advanced motion control;
- Extensive I/O options;
- Well-suited for larger or more complex CNC machines;
Cons:
- Higher cost compared to Arduino-based solutions;
- May require more advanced knowledge of CNC control;
4) GRBL-Compatible All-in-One Controllers
Various all-in-one CNC controllers available combine an Arduino-compatible microcontroller with integrated stepper motor drivers and I/O ports. These controllers often come preloaded with GRBL firmware and are designed for easy setup.
Pros:
- Simplified wiring and compact design;
- Suitable for small to medium-sized CNC machines
- Quick setup and ease of use;
Cons:
- Limited scalability and expansion options;
- May not be suitable for larger or more complex CNC systems;
5) Custom PCBs and Components
For advanced users and those with specific requirements, custom PCB designs and components can be an alternative to off-the-shelf CNC shields. You can design and assemble your own CNC control board tailored to your project’s needs, combining microcontrollers, motor drivers, and sensors as required.

Pros:
- Complete customization and flexibility
- Ability to optimize the design for your specific CNC machine;
Cons:
- Requires advanced electronics and PCB design skills;
- Time-consuming and may involve higher development costs;
When choosing a CNC shield alternative for your Arduino, consider factors such as your project’s complexity, budget, desired features, and your level of expertise in CNC control and electronics. Each alternative has its strengths and limitations, so selecting the right solution depends on your specific needs and goals.
FAQ:
1. Why use a CNC shield Arduino?
Using a CNC shield with an Arduino offers several advantages:
- Simplicity: CNC shields are designed to simplify the connection of CNC components like stepper motors, limit switches, and sensors to an Arduino. This simplifies the setup process;
- Cost-Effective: CNC shields are often cost-effective solutions compared to dedicated CNC controllers, making CNC projects more accessible;
- Community Support: Arduino-based CNC projects benefit from a large and active user community, providing access to tutorials, libraries, and troubleshooting assistance;
- Flexibility: Arduino boards are highly programmable, allowing you to customize and adapt your CNC setup to various applications and requirements;
- Open Source: Many CNC shields and firmware, such as GRBL, are open source, allowing you to modify and improve them according to your needs;
2. Can I use CNC Shield without GRBL?
Yes, you can use a CNC shield without GRBL, but it may require a different firmware or software for CNC control. GRBL is a popular choice because it’s specifically designed for CNC applications and is compatible with Arduino-based CNC shields. However, if you opt for a different firmware or software, you’ll need to ensure that it supports your CNC shield and Arduino board.
Alternative firmware options for CNC control include Marlin (commonly used for 3D printing), LinuxCNC (for Linux-based systems), and Mach3 (for Windows-based systems). Each of these firmware options has its own configuration and setup process, so you’ll need to follow the documentation and guidelines provided for your chosen firmware.
3. How to control stepper motors with Arduino CNC Shield?
To control stepper motors with an Arduino CNC shield, follow these steps:
- Wiring: Connect your stepper motors to the appropriate motor driver connectors on the CNC shield. Typically, these connectors are labeled as X, Y, Z, and A for different axes. Ensure the wiring is correct, matching the motor phases to the driver pins;
- Power Supply: Connect the power supply to the CNC shield, ensuring that it provides the necessary voltage and current for your stepper motors. Adjust the current settings on the motor drivers if required;
- Arduino Setup: Make sure your Arduino board is connected to your computer via USB, and you have the necessary CNC control software installed;
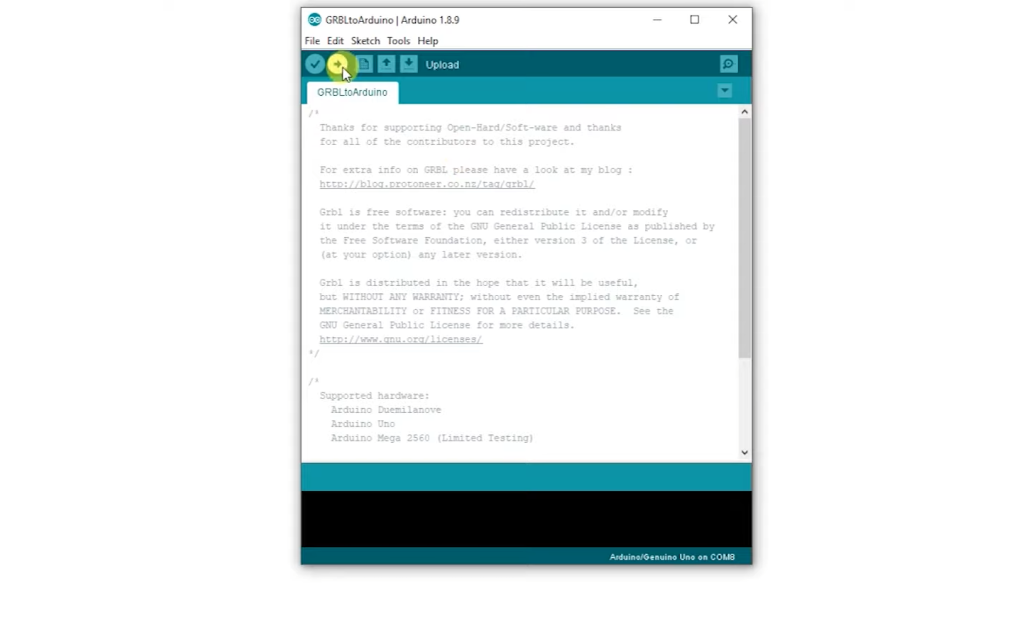
- Upload Firmware: If you’re using GRBL, upload the GRBL firmware to your Arduino using the Arduino IDE or appropriate firmware flashing tool. Configure the firmware settings as needed for your CNC machine;
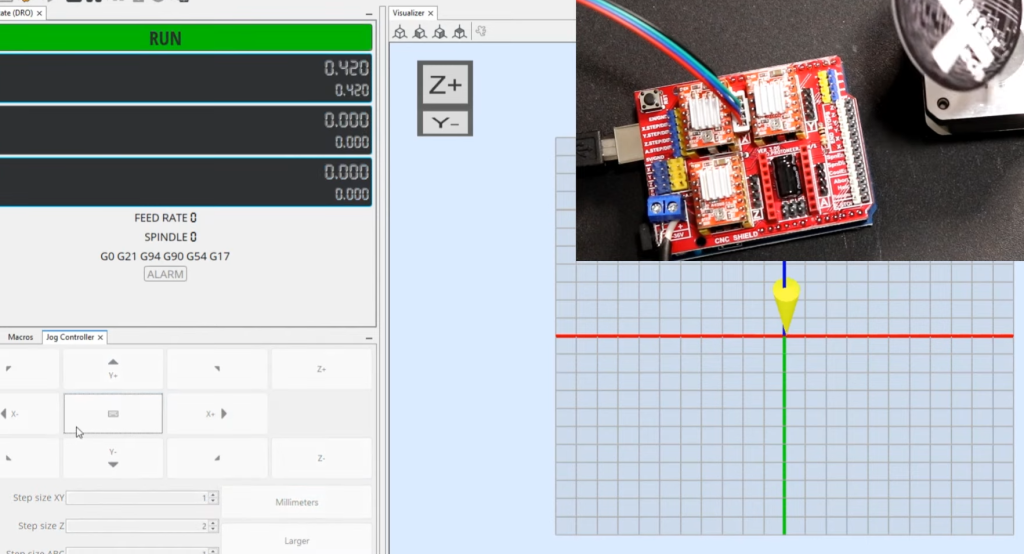
- Software Control: Open your CNC control software (e.g., Universal Gcode Sender, bCNC, or CNCjs), connect to your Arduino, and send G-code instructions to control the stepper motors. You can use G-code commands to move the motors in various directions and control other aspects of your CNC machine;
- Test and Calibration: Perform test runs and calibration to ensure that the stepper motors move accurately and according to your specifications. Adjust motor steps per revolution and other settings as necessary to achieve the desired precision;
4. What is the voltage of a CNC shield?
The voltage rating of a CNC shield can vary depending on the specific model and design. However, many CNC shields are designed to work with either 12V or 24V power supplies, which are common voltage levels for CNC applications. Some advanced CNC shields may support higher voltages, especially for more powerful CNC machines.
It’s crucial to check the voltage requirements and compatibility of your CNC shield before connecting it to a power supply. Using the correct voltage is essential to prevent damage to the shield and associated components, such as stepper motor drivers and the Arduino board.
5. Does the CNC Shield power the Arduino?
No, the CNC shield does not provide power to the Arduino. The Arduino board requires its own power source, typically through a USB connection to a computer or an external power supply connected to the Arduino’s power input.
The CNC shield and Arduino must share a common ground for proper communication and operation, but they have separate power sources. The CNC shield has its power supply for driving motors and other components, while the Arduino has its power source for processing and control.
Useful Video: Arduino CNC Shield Tutorial – Control Stepper Motors using CNC Shield V3.0
References:
- https://www.aranacorp.com/en/using-an-arduino-cnc-shield-v3/
- https://www.zyltech.com/arduino-cnc-shield-instructions/
- https://srituhobby.com/how-to-use-a-cnc-shield-step-by-step-guide-with-grbl/
- https://howtomechatronics.com/tutorials/how-to-setup-grbl-control-cnc-machine-with-arduino/
- https://www.cncsourced.com/cnc-machining/how-to-connect-stepper-motors-to-arduino-grbl-with-without-a-cnc-shield/
- https://diymachining.com/diy-cnc-controller-how-to-setup-your-arduino-gshield/
- https://mellowpine.com/cnc/best-cnc-shield-arduino/
- https://pick3dprinter.com/arduino-cnc-shield/