
Did you know that digital displays capture 400% more views than static signs? This surprising statistic shows why businesses are rapidly adopting dynamic signage solutions. The right setup can transform how you communicate with customers and staff.
This guide walks you through creating an affordable digital signage system. You’ll learn to build a media player that turns any display into an engaging content hub. The process combines accessible hardware with powerful cloud management.
Whether you’re setting up for retail, offices, or education, this approach makes professional signage achievable. You’ll discover how to prepare your equipment, install software, and configure your first content playlist. The system works seamlessly once properly configured.
By following these steps, you’ll have a fully functional display solution ready to impress your audience. While some technical knowledge helps, we’ve broken everything into clear, manageable instructions. Anyone can follow along and achieve great results.
Get ready to unlock the potential of modern digital communication. This method offers flexibility and cost-effectiveness that traditional options can’t match. Your journey toward dynamic visual communication starts here.
Key Takeaways
- Digital signage captures significantly more attention than static displays
- This solution combines affordable hardware with cloud-based management
- The setup process works for various business and educational settings
- Step-by-step instructions make technical setup accessible to beginners
- You’ll learn hardware preparation, software installation, and content configuration
- The final result is a professional-grade digital signage system
- This approach offers cost savings compared to traditional signage options
Introduction to Yodeck and Raspberry Pi
Visual communication has evolved dramatically with the advent of cost-effective digital display systems. These modern solutions combine powerful cloud-based software with accessible hardware components.
Overview of Digital Signage Benefits
Digital signage transforms how businesses connect with their audience. Dynamic content captures attention far more effectively than static displays.
The right software platform enables real-time updates from any location. This flexibility allows businesses to respond quickly to changing needs and promotions.
Why Choose a Raspberry Pi for Your Players?
Selecting the right device for your digital signage network is crucial. Affordable single-board computers offer exceptional value without sacrificing performance.
These compact devices deliver reliable operation while keeping costs manageable. Their small size allows for discreet installation behind displays.
| Feature | Traditional Proprietary Systems | Modern Affordable Solutions |
|---|---|---|
| Initial Cost | High investment required | Budget-friendly setup |
| Flexibility | Limited customization options | Highly adaptable to needs |
| Maintenance | Vendor-dependent support | Community-driven assistance |
| Setup Complexity | Professional installation needed | User-friendly configuration |
Essential Hardware and Tools
Proper preparation with compatible hardware components ensures a seamless digital signage experience. Having everything ready before you start prevents interruptions and technical hiccups.
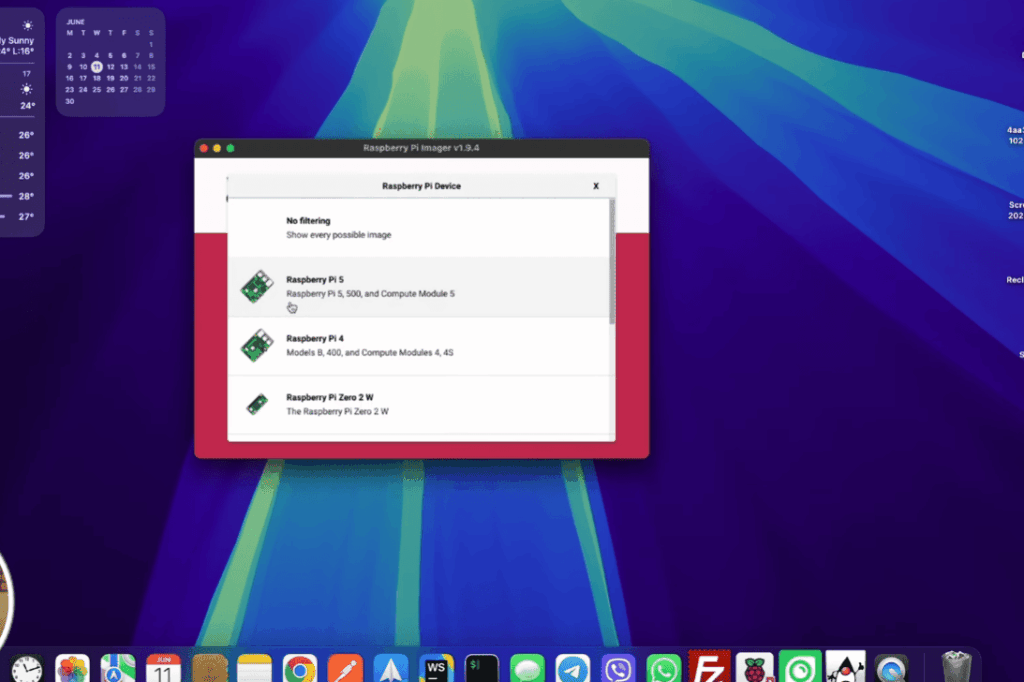
Required Raspberry Pi Models and Accessories
The Raspberry Pi 4 delivers excellent performance for most applications. Models with 4GB or 8GB RAM handle multiple web pages simultaneously, while 1GB or 2GB versions work perfectly for video content.
Fully supported devices include Pi 4 (all versions), Pi 3 B+, Pi 3, Pi 2, and Pi 3 Compute Module. The newer Pi 5 is also compatible with any configuration.
Recommended SD Card and Power Supply
Choose a Class 10 SD card from a reputable brand. For older Pi models, 8GB works but 16GB is recommended. The Pi 5 requires at least 16GB, with 32GB being ideal for media storage.
Power requirements vary by device. The Pi 5 needs the official power supply, while Pi 4 requires 5V/3A. Using the correct adapter prevents performance issues and ensures stable operation.
A metal protective case provides superior heat dissipation compared to plastic alternatives. You’ll also need an HDMI monitor or TV, reliable internet access, and an SD card reader for computer preparation.
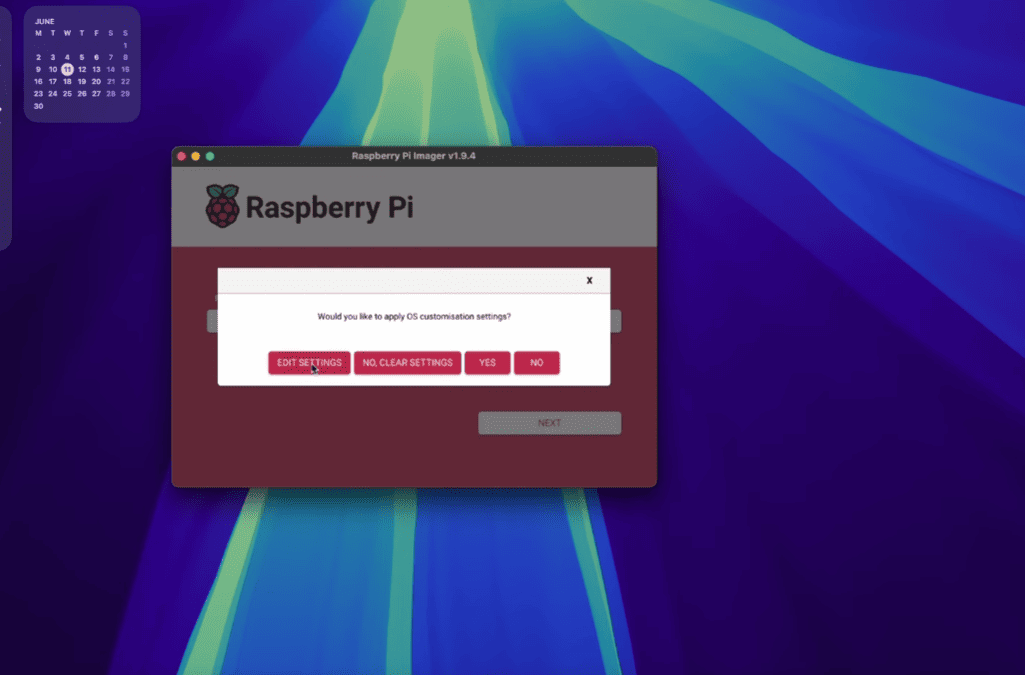
Downloading the Yodeck SD Card Image
The foundation of your digital display setup starts with downloading the proper operating system image. This crucial step ensures your media player will function correctly from the first boot.
Where to Find the Latest Software
Visit the official Yodeck website to access the most current software versions. The platform offers separate downloads for different hardware generations.
Choose the correct image file based on your specific device model. Selecting the appropriate version prevents compatibility issues during installation.
Unzipping and Verifying the IMG File
After downloading completes, extract the compressed zip file to your computer’s drive. Use extraction tools like WinRAR for Windows or built-in utilities for Mac systems.
The unzipped content should reveal a single IMG file with substantial size. Verify the file extension and dimensions match expected specifications before proceeding.
| Device Type | Required File Size | File Format | Extraction Required |
|---|---|---|---|
| Older Models | Approximately 3.2GB | .img | Yes |
| Newer Hardware | About 5GB | .img | Yes |
| All Versions | Varies by model | .zip (initial) | Before flashing |
Save the extracted image file in an accessible location like your Downloads folder. Proper file preparation sets the stage for successful SD card flashing in the next phase.
Flashing Your SD Card with Etcher
Transforming your SD card into a functional media player requires precise image writing. This process ensures your device will boot correctly with the proper software installed.
Using the right tools makes this technical task surprisingly straightforward. The balenaEtcher application simplifies what could be a complex procedure.
Installation and Setup of Etcher
Download Etcher from the official balenaEtcher website. This free tool works identically across Windows, Mac, and Linux systems.
Windows users should double-click the .exe file and follow the setup wizard. For best results, run the program in Administrator Mode.
Mac installation is even simpler. Just drag the application to your Applications folder and double-click to launch.
Step-by-Step Flashing Process
Begin by inserting your SD card into your computer’s card reader. Close any automatic pop-up windows that appear.
The flashing process follows three clear steps:
- Select Image: Choose your unzipped IMG file
- Select Drive: Etcher automatically detects your SD card
- Flash: Click the button to begin writing
During this step, the tool formats the card, writes the data, and verifies the installation. A progress bar shows completion status.
The entire process typically takes 5-10 minutes. Once verification completes, your card is ready for use.
Setting Up Your yodeck raspberry pi Player
The transition from computer preparation to hardware assembly marks an exciting milestone in your digital signage journey. You’re moving from software configuration to physical setup, bringing your display system closer to reality.

Inserting the SD Card into Your Device
After successfully flashing your storage media with Etcher, carefully remove card from your computer’s reader when prompted. The preparation phase is complete, and your media is ready for installation.
Locate the SD card slot on your single-board computer. For most models, this is on the underside of the board. Gently insert card into the slot with metal contacts facing the correct direction.
Ensure the card is fully seated by pressing until you hear a soft click. This secure connection prevents boot failures. Creating Yodeck player hardware is now complete.
Never remove card from your device while powered on. This can corrupt the software and require starting over. Creating Yodeck player requires careful handling throughout the process.
The first boot will automatically expand the file system to use all available space. This one-time process may take several minutes. Subsequent startups will be much faster.
Double-check that the card is securely inserted before connecting other cables. Creating Yodeck player successfully depends on this proper physical setup. You’re now ready for the connection phase.
Connecting to HDMI, Ethernet, and WiFi
Physical connections transform your prepared device into a functioning display system. This crucial step ensures your content appears correctly on screen.
Always establish connections before applying power. This prevents boot issues and ensures smooth initialization.
Establishing a Video Connection
Connect your HDMI cable from the device’s port to your display. Use the primary port closest to the power input.
Different models have varying port types. Older versions use full-size HDMI while newer ones feature micro-HDMI.
Verify your display is powered on and set to the correct input source. This simple check saves troubleshooting time later.
Using Ethernet and Configuring WiFi
For initial setup, an ethernet cable provides the most reliable network connection. Plug directly into your router or switch.
This wired approach eliminates wireless configuration challenges during registration. It ensures immediate internet access.
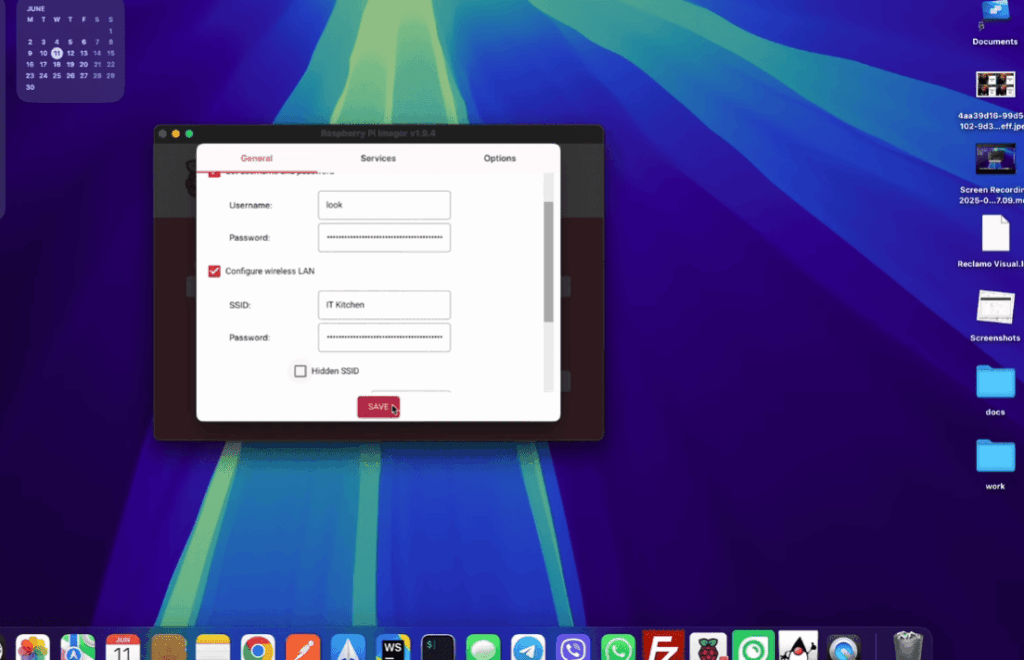
If you must use WiFi, configure it after the first boot. The platform includes a wireless setup wizard for this purpose.
| Connection Type | Setup Complexity | Reliability |
|---|---|---|
| Ethernet Cable | Simple plug-and-play | Highly stable |
| WiFi | Requires configuration | Depends on signal |
| HDMI | Straightforward | Consistent performance |
Specific device models require keyboard input for WiFi setup. Press CTRL+ALT+F10 during boot to access the wireless wizard.
Double-check all cable connections before proceeding. A stable network connection is mandatory for player registration.
Powering On and Initializing the Device
Now comes the exciting moment when your digital signage project comes to life. This final preparation stage brings everything together and prepares your system for registration.
After confirming all physical connections, plug in the power supply to begin the startup sequence. The initialization process is now underway.
Boot Sequence and Registration Code Display
The first startup takes longer than normal boots. Your device needs up to five minutes to expand the file system on its storage card.
Watch your display screen carefully during this phase. You’ll see system messages scrolling by as important setup procedures complete.
Normal startup times after this initial boot take about 50 seconds. Patience during this first power-on is essential for proper configuration.
When initialization finishes successfully, your screen will show either an 8-digit Registration Code or a connectivity error message. This indicates the process has completed.
Never interrupt power to your device until you see one of these final screens. Look for blinking status messages in the bottom-right corner showing details like “Loading” or “Configuring.”
These status details indicate critical procedures are active. Removing power during these phases risks corrupting your software installation.
If your display remains blank after 10 minutes, check all cable connections and verify your display input settings. Once the Registration Code appears, your device is ready for account registration.
Registering Your Yodeck Account and Player
Registration bridges the gap between your physical setup and online content management capabilities. This crucial step connects your hardware to the cloud platform.
Entering the Registration Code
Log into your yodeck account and navigate to the Screens section. Click “+Add Screen” to begin registering your new display device.
Carefully enter the 8-digit code shown on your player’s display. This unique identifier links your specific hardware to your cloud profile.
After saving the code, your yodeck player should register within one minute. The screen will then transition to showing your default content.
“Successful registration transforms individual hardware into a coordinated digital signage network.”
Troubleshooting Connectivity Issues
If you see error messages instead of a registration code, network problems are likely preventing internet access. Verify your Ethernet connection or WiFi settings.
For complex networks with firewalls or proxies, establish a basic wired connection first. Additional configurations can be managed later through the online portal.

| Scenario | Expected Result | Solution |
|---|---|---|
| Proper Registration | Content displays within 60 seconds | Proceed to content setup |
| Network Error | Error message on screen | Check cables or WiFi configuration |
| Code Not Recognized | Registration failure message | Verify code accuracy and retry |
Your yodeck player based on affordable hardware uses built-in time synchronization for accurate scheduling. For specialized deployments, custom time servers can be configured through your account settings.
Conclusion
You’ve successfully built a professional digital signage system from start to finish. Your media player now stands ready to deliver dynamic content that captures attention and communicates effectively.
The cloud management portal gives you complete remote control over your display network. You can update schedules, upload new media files, and monitor performance from anywhere. This flexibility makes your investment truly powerful.
Remember to explore advanced features as you grow more comfortable with the platform. Multi-zone layouts, interactive content, and synchronized playback across multiple players offer exciting possibilities. Your system can evolve with your changing needs.
Keep your software updated through your account to ensure optimal performance. The local storage drive provides reliable playback even during brief internet interruptions. Your setup represents a cost-effective solution that delivers professional results.
Congratulations on mastering this innovative approach to digital communication! Your new signage player will serve as a versatile tool for years to come.